Posted on

Oud-Smoked Dark Chocolate Croissant — The Laminated Luxury Series

The Laminated Luxury Series — No. 8 of 8

Every series needs a final statement. This is ours.

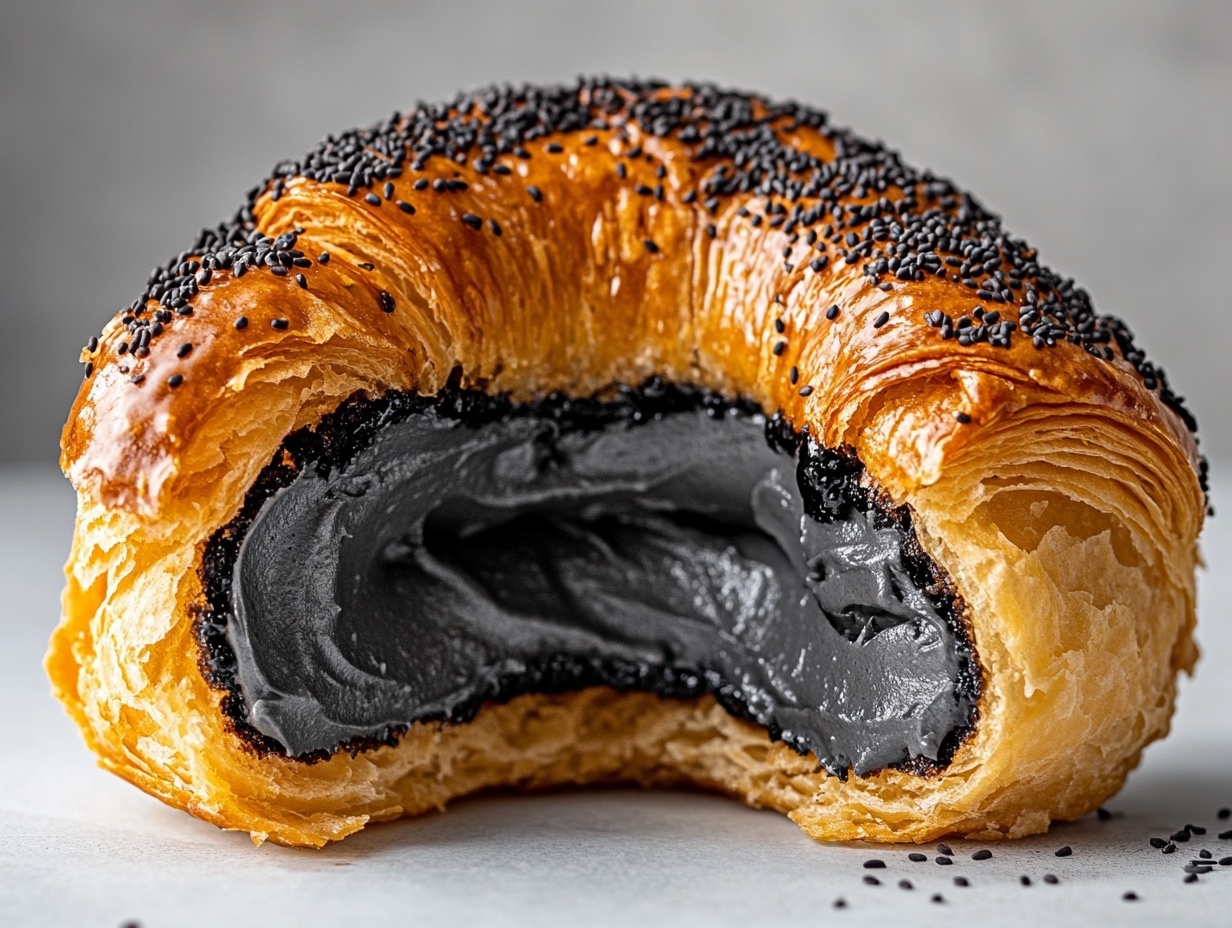
The Oud-Smoked Dark Chocolate Croissant begins before the dough is even mixed. The butter block is cold-smoked with oud wood chips — the same resinous, ancient wood burned in Gulf incense burners for centuries — for two hours before lamination begins. That smoke infuses every layer. When the croissant bakes, the heat unlocks the oud fragrance from the butter, and the kitchen fills with something extraordinary: pastry and perfume, inseparable.

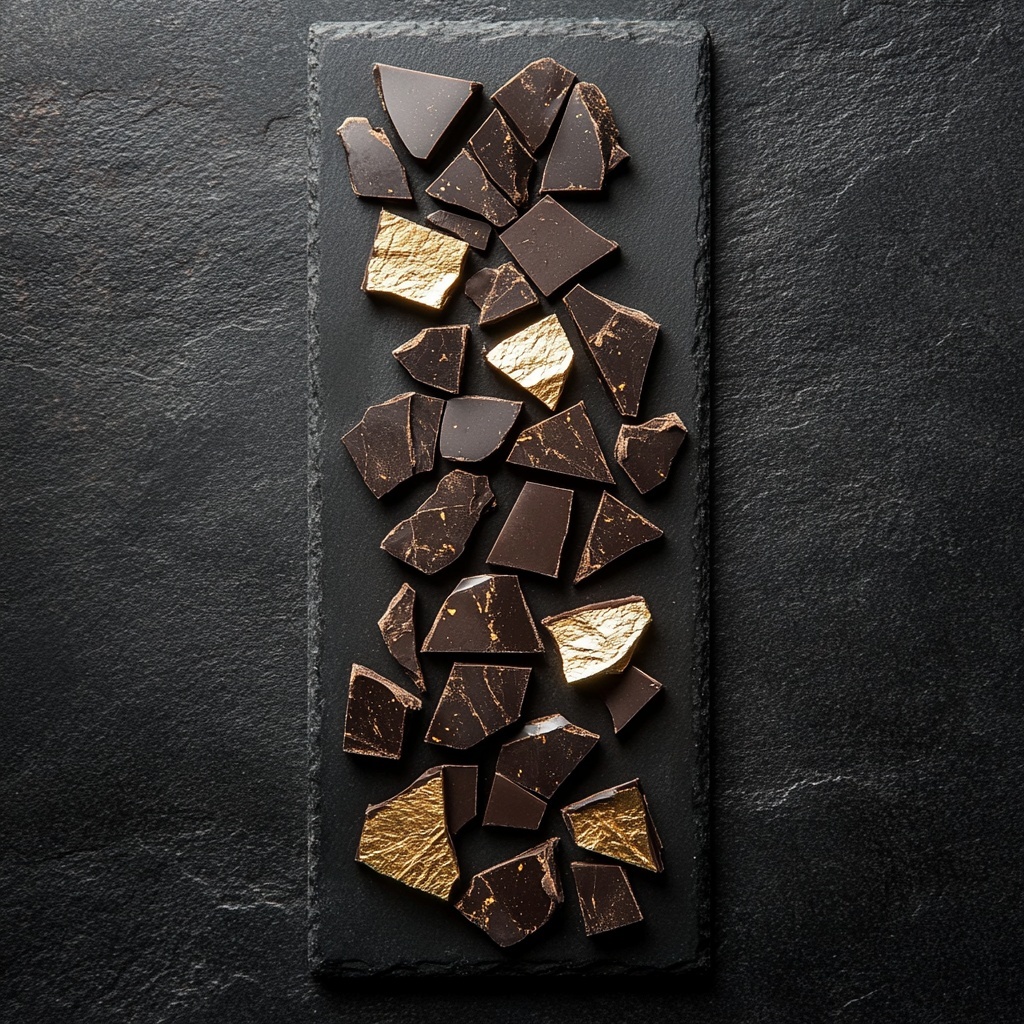
The filling is an 85% dark chocolate ganache, seasoned with a pinch of smoked sea salt. The finish is charcoal flake salt and a single curl of dark chocolate. Nothing more is needed.


Chef’s Note

Oud wood chips are available from Arabic perfume suppliers and specialist food importers. You do not need much — a small handful in a smoking gun is sufficient. The goal is a whisper of smoke in the butter, not a bonfire. Over-smoking produces bitterness that competes with the chocolate rather than complementing it.

If oud is unavailable, sandalwood chips produce a similar warm, resinous character. Do not substitute with liquid smoke — it has none of the complexity and will ruin the butter entirely.

This croissant is best eaten within an hour of baking, while the smoke fragrance is still alive in the layers. It does not keep. It is not meant to.


Ingredients

The Dough

  • 500g strong bread flour, 10g salt, 80g sugar, 10g yeast, 300ml cold milk, 30g softened butter

The Oud-Smoked Butter Block

  • 280g European-style unsalted butter (84% fat), cold
  • Small handful oud wood chips (or sandalwood)

85% Dark Chocolate Ganache & Finish

  • 200g 85% dark chocolate, finely chopped
  • 180ml double cream, 20g unsalted butter, 1 tsp smoked sea salt
  • Charcoal flake salt, dark chocolate curls

Method

Shape the cold butter into a 20cm beurrage block. Cold-smoke with oud wood chips three times over two hours using a smoking gun — 30 minutes per infusion. Refrigerate overnight alongside the détrempe dough. Laminate over two days with three double folds. Shape into classic croissants, proof at 24°C for 2–2.5 hours, egg wash and bake at 190°C (fan) for 18–20 minutes. Make the ganache by pouring hot cream over chopped chocolate in three additions, adding butter and smoked sea salt. Once set to pipeable consistency, fill each croissant via a base slit. Finish with charcoal flake salt and a dark chocolate curl.


The Interior

Oud-Smoked Dark Chocolate Croissant cross-section
The 85% dark chocolate ganache and oud-smoked layers — the finale of the Laminated Luxury Series.

The Series: Complete

Eight pastries. Eight techniques. One series that treats laminated dough not as a vehicle for breakfast, but as one of the great canvases in patisserie. From the Noir Croissant to this — every recipe is on the blog.


The Laminated Luxury Series — Complete

No. 7 — Pistachio & Raspberry Croissant Ring
You are reading No. 8 — Oud-Smoked Dark Chocolate Croissant — the finale.

Read the full series from the beginning: No. 1 — Noir Croissant →


🖤 Want All 8 Recipes in One Place?

The complete Laminated Luxury Series — all 8 Michelin-level croissant recipes, technique notes, plating guides, and photography direction — is available as a premium recipe collection in our shop.

Browse the Shop →

Posted on

Pistachio & Raspberry Croissant Ring — The Laminated Luxury Series

The Laminated Luxury Series — No. 7 of 8

The crown. Laminated dough twisted, shaped into a ring, and baked until the layers spiral outward like a wreath. The interior is filled with pistachio frangipane — dense, buttery, deeply nutty — and finished with a sharp raspberry coulis that cuts through the richness with precision. Fresh raspberries and silver dust crown the top.

This is the most visually commanding pastry in the series. The contrast of the green pistachio, the vivid red raspberry, and the golden laminated layers makes it unmissable on a table or a screen.


Chef’s Note

Pistachio frangipane is made from blanched, peeled pistachios — not roasted, not salted. The raw nut has a delicate sweetness and a vivid green colour that survives the oven. Source Iranian or Sicilian pistachios if possible — their colour and flavour are in a different league.

The raspberry coulis should be tart — almost aggressively so. Use fresh or frozen raspberries without added sugar, and add lemon juice generously. The acidity is what makes this pastry work.


Ingredients

The Dough

  • 500g strong bread flour, 10g salt, 80g sugar, 10g yeast, 300ml cold milk, 30g softened butter
  • 280g European-style butter (84% fat), cold — for lamination

Pistachio Frangipane

  • 150g blanched peeled pistachios (Iranian or Sicilian)
  • 120g softened butter, 120g caster sugar, 2 eggs, 20g plain flour, 1 tsp almond extract

Raspberry Coulis & Finish

  • 300g raspberries, 2 tbsp icing sugar, juice of 1 lemon
  • 150g fresh raspberries, 30g chopped pistachios, edible silver dust, icing sugar

Method

Laminate the dough over two days. Roll to 3mm × 25cm wide. Spread cold pistachio frangipane across the surface leaving a 2cm border. Roll into a log, cut lengthways to expose layers, twist the two halves together keeping cut sides up, form into a ring and seal ends. Proof at 24°C for 1.5–2 hours. Brush with egg wash and bake at 185°C (fan) for 22–25 minutes. Cool completely. Spoon raspberry coulis into the crevices, arrange fresh raspberries and pistachios on top, dust with icing sugar and silver dust.


The Interior

Pistachio Raspberry Croissant Ring cross-section
The pistachio frangipane and raspberry coulis layers revealed in cross-section.

The Laminated Luxury Series

No. 6 — Cardamom & Burnt Caramel Cruffin  |  You are reading No. 7 — Pistachio & Raspberry Croissant Ring
Next: No. 8 — Oud-Smoked Dark Chocolate Croissant →


🖤 Want All 8 Recipes in One Place?

The complete Laminated Luxury Series — all 8 Michelin-level croissant recipes, technique notes, plating guides, and photography direction — is available as a premium recipe collection in our shop.

Browse the Shop →

Posted on

Cardamom & Burnt Caramel Cruffin — The Laminated Luxury Series

The Laminated Luxury Series — No. 6 of 8

The cruffin — a muffin-shaped croissant spiral — is the series’ most dramatic format. Laminated dough is rolled tightly, cut into spirals, and baked upright in a muffin tin until the layers fan outward like a bloom. This version fills each spiral with cardamom custard and finishes with a burnt caramel that sets to a glassy, amber shell.

The result is extraordinary: a pastry that shatters on the outside, yields a warm spiced custard within, and carries the deep bittersweet note of properly burnt caramel throughout.


Chef’s Note

Cardamom must be freshly ground. Pre-ground cardamom is a shadow of the real thing — the volatile oils dissipate within days of grinding. Buy green pods, crack them, remove the seeds, and grind immediately before use.

Burnt caramel is not a mistake — it is a technique. Take the sugar 30 seconds past the point of comfort. The bitterness that develops is the counterweight to the sweetness of the custard and the richness of the laminated dough.


Ingredients

The Dough

  • 500g strong bread flour, 10g salt, 80g sugar, 10g yeast, 300ml cold milk, 30g softened butter
  • 280g European-style butter (84% fat), cold — for lamination

Cardamom Custard

  • 500ml whole milk
  • 1.5 tsp freshly ground green cardamom (from ~12 pods)
  • 5 egg yolks, 120g caster sugar, 40g cornflour, 30g cold butter

Burnt Caramel & Finish

  • 200g caster sugar, 60ml warm double cream, 30g butter, 1 tsp fleur de sel
  • Fleur de sel and crushed cardamom pods to garnish

Method

Laminate the dough over two days. Roll to 3mm × 30cm wide, spread cold cardamom custard across the surface, roll into a log, cut into 6cm rounds and place cut-side up in a buttered muffin tin. Proof 1.5–2 hours at 24°C. Brush with egg wash and bake at 190°C (fan) 20–22 minutes. Once cool, pipe additional custard into each spiral. Cook sugar to dark mahogany caramel, add warm cream, butter, and fleur de sel. Spoon over each cruffin. Garnish with crushed cardamom and fleur de sel.


The Interior

Cardamom Burnt Caramel Cruffin cross-section
The caramel custard layers revealed — each spiral a cross-section of the lamination.

The Laminated Luxury Series

No. 5 — Rose & Lychee Croissant Tart  |  You are reading No. 6 — Cardamom & Burnt Caramel Cruffin
Next: No. 7 — Pistachio & Raspberry Croissant Ring →


🖤 Want All 8 Recipes in One Place?

The complete Laminated Luxury Series — all 8 Michelin-level croissant recipes, technique notes, plating guides, and photography direction — is available as a premium recipe collection in our shop.

Browse the Shop →

Posted on

Rose & Lychee Croissant Tart — The Laminated Luxury Series

The Laminated Luxury Series — No. 5 of 8

The croissant tart is the series at its most unexpected. The laminated dough is not rolled and shaped — it is pressed into a tart ring, where it bakes into a shell of extraordinary crunch and layering. The filling is a rose-lychee mousse: pale pink, intensely floral, with the delicate sweetness of lychee running beneath the rose like a second perfume.

Crystallised rose petals and lychee pearls finish it. This is the most feminine pastry in the series — and one of the most technically precise.


Chef’s Note

Rose water is assertive. A heavy hand turns this mousse into soap. Use 1 teaspoon maximum and taste before adding more — the rose should be present but not dominant. The lychee provides the sweetness; the rose provides the fragrance. They are partners, not rivals.

The croissant shell must be blind-baked with weights before filling. Without this step, the base will puff and buckle, leaving no room for the mousse.


Ingredients

The Croissant Tart Shell

  • 500g strong bread flour
  • 10g fine sea salt
  • 80g caster sugar
  • 10g instant yeast
  • 300ml whole milk, cold
  • 30g unsalted butter, softened
  • 280g European-style unsalted butter (84% fat), cold — for lamination

Rose-Lychee Mousse

  • 400g canned lychees, drained (reserve 80ml syrup)
  • 1 tsp rose water
  • 3 leaves platinum-grade gelatine, bloomed in cold water
  • 250ml double cream, whipped to soft peaks
  • 2 tbsp icing sugar
  • 1–2 drops natural pink food colouring (optional)

To Finish

  • Fresh rose petals, crystallised with egg white and caster sugar
  • 6–8 lychees, halved
  • Edible gold dust

Method

Laminate the dough over two days. Line a 20cm tart ring with the rolled dough to 4mm, blind bake at 185°C (fan) with weights for 18 minutes, then a further 8 minutes uncovered. Cool completely. Blend lychees with reserved syrup, sieve, dissolve bloomed gelatine in warmed purée, combine with rose water and icing sugar. Cool to light gel stage, then fold in whipped cream. Pour into the cooled shell. Refrigerate 3 hours minimum. Top with lychees, crystallised petals, and gold dust before serving.


The Laminated Luxury Series

No. 4 — Black Sesame Paris-Brest  |  You are reading No. 5 — Rose & Lychee Croissant Tart
Next: No. 6 — Cardamom & Burnt Caramel Cruffin →


🖤 Want All 8 Recipes in One Place?

The complete Laminated Luxury Series — all 8 Michelin-level croissant recipes, technique notes, plating guides, and photography direction — is available as a premium recipe collection in our shop.

Browse the Shop →

Posted on

The Art of Tempering Chocolate — From Bean to Gloss

★ Technique Deep-Dive ★

The Art of Tempering Chocolate

Perfect Snap  ·  Mirror Gloss  ·  Silky Melt

Tempering is the single technique that separates professional chocolate work from everything else. It is not complicated — but it is precise. Master it once and every chocolate shell, bonbon, and dipped dessert you make will look and taste like it came from a Michelin-starred kitchen.

⏱ Time: 30–45 mins  ·  🌡 Precision required  ·  ⭐ Difficulty: Intermediate

Why Tempered Chocolate Is Different

Break a piece of good chocolate and listen. That clean, sharp snap — followed by a melt that coats your tongue without a trace of grease — is not an accident. It is the result of tempered chocolate: chocolate whose cocoa butter crystals have been aligned into a precise, stable formation called Form V (Beta crystals).

Untempered chocolate, by contrast, sets with a dull, streaky finish, a waxy or grainy texture, and a melt that feels thick and heavy. This is what happens when you melt chocolate and simply let it cool — the cocoa butter crystallises randomly, forming an unstable structure. Tempering is the process of deliberately guiding the chocolate through a precise temperature curve to force only the correct crystals to form.

The result: a mirror gloss, a definitive snap, and a clean, rapid melt on the palate. Every professional chocolate shell, enrobed truffle, and moulded bonbon depends on this one technique.

What You Will Learn

✔️ The science behind tempering — why it works and what goes wrong
✔️ The three critical temperatures for dark, milk and white chocolate
✔️ Three tempering methods: tabling, seeding, and microwave
✔️ How to test your temper before committing
✔️ How to rescue chocolate that has gone out of temper


The Science in 60 Seconds

Cocoa butter can crystallise into six different forms (Form I through Form VI). Only Form V produces the glossy, snapping, stable chocolate we want. The tempering process works by:

01 — Melt

Heat the chocolate fully above 50°C to destroy all existing crystal structures. You start with a blank slate.

02 — Cool

Lower the temperature to a range where Form V crystals begin to form alongside undesirable forms. You are seeding the correct crystal structure.

03 — Reheat

Raise the temperature slightly to melt out the unstable crystals, leaving only the stable Form V. The chocolate is now in temper and ready to use.

The Temperature Chart

Dark Chocolate (70%+)

Melt to: 50–55°C
Cool to: 27–28°C
Reheat to: 31–32°C

Milk Chocolate

Melt to: 45–50°C
Cool to: 26–27°C
Reheat to: 29–30°C

White Chocolate

Melt to: 40–45°C
Cool to: 25–26°C
Reheat to: 27–28°C


Three Methods

Method 01 — Tabling (The Classic)

This is how chocolate is tempered in every professional kitchen. Melt your chocolate fully, then pour two-thirds onto a cold marble or granite surface. Using a palette knife and a bench scraper, work the chocolate continuously — spreading it out and folding it back over itself — until it thickens noticeably and reaches the cooling temperature for your chocolate type. Scrape it back into the bowl with the remaining warm third, stir thoroughly, and check the temperature. You should now be at the working temperature.

Best for: large volumes (400g+). Most control. Requires marble surface.

Method 02 — Seeding (Best for Home Use)

Melt two-thirds of your chocolate fully. Remove from heat and add the remaining one-third as finely chopped solid chocolate (or couverture callets). Stir continuously. The solid chocolate acts as a seed — it already contains stable Form V crystals, which it transfers to the melted mass as it dissolves. Keep stirring until the temperature drops to the working temperature. No marble slab required.

Best for: smaller quantities at home. Reliable and clean.

Method 03 — Microwave (The Fastest Route)

Use only with couverture callets (not chopped bars, which heat unevenly). Place callets in a microwave-safe bowl. Heat in 15-second bursts on 50% power, stirring thoroughly between each burst. Stop when approximately 75% of the callets are melted — residual heat will melt the rest. Stir until fully smooth and at the correct working temperature.

Best for: small quantities, speed. Less forgiving — use a thermometer.

Tempering chocolate — professional technique

Testing & Troubleshooting

The Knife Test

Dip the tip of a clean palette knife into your tempered chocolate and hold it for 30 seconds at room temperature. If the chocolate sets firm and glossy with no streaking, you are in temper. If it remains wet or sets dull, you are not.

Bloom — What Went Wrong

White streaks or a grey, matte surface after setting = fat bloom. The cocoa butter separated and re-crystallised incorrectly. Almost always caused by incorrect temperatures. Remelt and start again.

Seized Chocolate

A single drop of water will cause melted chocolate to seize into a stiff, grainy paste. All equipment must be completely dry. If it seizes, whisk in boiling water a teaspoon at a time to make a ganache — the chocolate cannot be recovered for tempering.

Out of Temper Mid-Use

If your chocolate thickens too much while working, it has dropped below the working temperature. Warm it very briefly over a bain-marie to 31–32°C (dark) and stir — this can bring it back without starting over.

The Kit You Need

Non-Negotiable

Digital probe thermometer
Marble or granite slab (tabling)
Bench scraper and palette knife
Heatproof bowl
Couverture chocolate (not baking chips)

Recommended

Chocolate moulds (polycarbonate)
Dipping forks
Acetate sheets
A cool, dry room (18–20°C ideal)
Infrared thermometer gun

The Right Chocolate

Use couverture — chocolate with a higher cocoa butter content (31–38%) than regular chocolate. Valrhona, Callebaut, and Cacao Barry are the professional standards. Callets (pre-portioned drops) are easiest to work with.

What to Make Once You’re in Temper

Chocolate Bonbons

Pour into polycarbonate moulds, tap out the excess to form a shell, fill with ganache or praline, and seal with a second layer. Unmould once set — they should release cleanly with a mirror finish.

Chocolate Decorations

Spread thinly on acetate, allow to semi-set, then cut or shape into shards, curls, or feathered designs. Essential for plating Michelin-level desserts.

Enrobing Truffles

Roll ganache centres in tempered chocolate using dipping forks. Tap gently to remove the excess. Allow to set on parchment. The snap when you bite through will be flawless.

Chocolate Spheres

Brush tempered chocolate into hemisphere moulds, allow to set, and join the halves with a warm palette knife. Used in Michelin kitchens worldwide — and now yours.

Posted on 1 Comment

How to Make Crème Brûlée — The Perfect Crack Every Time

★ French Classic ★

How to Make Crème Brûlée

The Perfect Crack  ·  Every Time

Silky vanilla custard beneath a flawless caramelised sugar crust that shatters at the tap of a spoon. This is the exact recipe, temperature, and torch technique used in French restaurants — perfected for your home kitchen.

⏱ Prep: 15 mins  ·  Bake: 35 mins  ·  Chill: 4 hrs  ·  ⭐ Difficulty: Easy–Intermediate

What Makes a Perfect Crème Brûlée

Crème brûlée is one of the most iconic French desserts for a reason — it is the perfect marriage of contrasting textures. The custard must be set but trembling, cold at its core, and intensely vanilla. The sugar crust must be paper-thin, perfectly amber, and crack cleanly without any bitterness from over-caramelisation.

Most failures come down to three things: wrong cream-to-yolk ratio, incorrect oven temperature, or poor torch technique. This recipe eliminates all three variables with precise measurements and method.

What You Will Need

✔️ 6 egg yolks (large, room temperature)
✔️ 600ml double cream (heavy cream)
✔️ 80g caster sugar + extra for the crust
✔️ 1 vanilla pod (or 2 tsp high-quality vanilla extract)
✔️ Pinch of fine sea salt

Equipment: 4–6 ramekins, roasting tin, kitchen torch, digital thermometer


The Method

01 — Infuse

Split the vanilla pod and scrape the seeds into the cream. Add the pod. Heat gently to just below simmering (82°C) — do not boil. Remove from heat and infuse for 15 minutes. Remove the pod.

02 — Whisk

Whisk egg yolks and sugar together until pale and slightly thickened — about 2 minutes. Do not over-whisk; you want as few air bubbles as possible for a smooth custard.

03 — Temper

Pour the warm cream slowly into the yolk mixture, stirring constantly. Never the reverse. Strain through a fine sieve to remove any cooked egg and vanilla pod remnants. Skim the foam.

04 — Bake

Pour into ramekins set in a roasting tin. Fill the tin with hot water to halfway up the ramekins. Bake at 150°C (fan 130°C) for 30–35 minutes until set with a gentle wobble at the centre.

05 — Chill

Remove from the water bath. Cool to room temperature, then refrigerate for a minimum of 4 hours or overnight. The custard must be completely cold before torching.

06 — Torch

Sprinkle a thin, even layer of caster sugar (1–1.5 tsp) over each custard. Torch in slow, circular motions from 5cm above until deep amber. Allow to set for 60 seconds before serving.

The Temperature Guide

Cream Infusion

82°C

Just below simmer. Never boil.

Oven Temperature

150°C

Fan 130°C. Low and slow.

Set Custard Core

77°C

Internal temp when done.

Sugar Caramelisation

160°C

Amber, not dark brown.


Torch Technique — The Secrets

Sugar Layer Thickness

One thin, even layer is all you need — approximately 1 to 1.5 teaspoons per ramekin. Too thick and the sugar stays pale in the centre while the edges burn. Tilt the ramekin to distribute evenly before torching.

Torch Distance & Motion

Hold the torch 5cm from the surface. Move in slow, overlapping circular motions — never hold it still. The goal is even caramelisation across the entire surface. Watch for the colour: pale gold to deep amber is the window. The moment you see any smoke, move away.

Double Layer Trick

For an extra-thick, ultra-crisp crust: torch the first layer, let it cool for 30 seconds, add a second thin layer of sugar, and torch again. This is the professional technique for a crust that holds its snap even after a few minutes on the table.

Troubleshooting

Custard won’t set

Oven too hot, water bath too shallow, or ramekins too deep. Reduce oven by 10°C and extend baking time. The wobble test: jiggle the ramekin — only the very centre should move.

Grainy or curdled texture

Cream was too hot when added to yolks, or oven was too high. Always temper slowly and always bake in a water bath. Strain the mixture before pouring.

Sugar won’t caramelise evenly

Layer too thick, custard not cold enough, or torch too far away. Ensure the custard is fridge-cold, sugar layer is thin, and torch is at 5cm maximum distance.

Crust goes soggy

Serve immediately after torching. The crust will begin to absorb moisture from the custard within 10–15 minutes. Torch at the table for maximum drama and perfect crack.

★ Continue the Series ★

More Michelin Star Recipes

Posted on

Black Sesame Paris-Brest — The Laminated Luxury Series

The Laminated Luxury Series — No. 4 of 8

The Paris-Brest was created in 1910 to celebrate a bicycle race between Paris and Brest. Its ring shape echoes a wheel. This version abandons the traditional praline filling in favour of something darker — a black sesame praline cream with a depth and nuttiness that makes the original feel one-dimensional.

The pastry itself is a hybrid: choux dough piped over a laminated croissant base, baked together until the exterior shatters and the interior yields. A charcoal glaze seals it. Silver dust finishes it. This is the series at its most architectural.


Chef’s Note

Black sesame paste is not the same as tahini. It is roasted until deeply nutty, almost bitter, with an earthiness that pairs beautifully with the richness of the praline cream. Source a quality paste — the difference between a good black sesame paste and a poor one is significant. If making your own, toast the seeds until fragrant and blend with a neutral oil until smooth.

The charcoal glaze is activated charcoal mixed into a mirror glaze base. It has no flavour impact — it exists purely for the visual drama of the near-black surface against the silver dust.


Ingredients

The Croissant Base

  • 500g strong bread flour
  • 10g fine sea salt
  • 80g caster sugar
  • 10g instant yeast
  • 300ml whole milk, cold
  • 30g unsalted butter, softened
  • 280g European-style unsalted butter (84% fat), cold — for lamination

Black Sesame Praline Cream

  • 120g black sesame paste
  • 80g praline paste (hazelnut or almond)
  • 400ml whole milk
  • 4 egg yolks
  • 100g caster sugar
  • 35g cornflour
  • 30g unsalted butter, cold
  • 250ml double cream, whipped to soft peaks

Charcoal Glaze & Finish

  • 150g dark mirror glaze
  • 1 tsp activated charcoal powder
  • 1 egg yolk + 1 tbsp cream (egg wash)
  • Edible silver dust
  • Black sesame seeds, for topping

Method

Laminate the dough over two days using three double folds. Roll to 4mm and cut rings using 14cm and 5cm cutters. Proof at 24°C for 2 hours, brush with egg wash and scatter black sesame seeds, then bake at 190°C (fan) for 18–20 minutes. Cool completely. Make the black sesame praline cream by combining a standard pastry cream base with sesame and praline pastes, then folding in whipped cream once cold. Apply charcoal glaze at 35°C. Split rings, pipe cream generously, replace tops, and finish with silver dust.


The Laminated Luxury Series

No. 3 — Saffron & Honey Kouign-Amann  |  You are reading No. 4 — Black Sesame Paris-Brest
Next: No. 5 — Rose & Lychee Croissant Tart →


🖤 Want All 8 Recipes in One Place?

The complete Laminated Luxury Series — all 8 Michelin-level croissant recipes, technique notes, plating guides, and photography direction — is available as a premium recipe collection in our shop.

Browse the Shop →

Posted on 1 Comment

Île Flottante Recipe — Poached Meringue with Praline & Crème Anglaise

★ Michelin Star Series ★

Île Flottante with Praline & Crème Anglaise

Spun Caramel  ·  Toasted Almond Praline  ·  Silky Vanilla Crème Anglaise

Billowing poached meringue islands floating on a sea of silky vanilla crème anglaise — one of the most elegant and technically demanding desserts in the French classical repertoire.

⏱ Prep: 45 mins  ·  ⏲ Chill: 1 hour  ·  ☁️ Serves: 6  ·  ⭐ Difficulty: Advanced

Ile Flottante with Praline and Creme Anglaise
Île Flottante — billowing meringue islands, silky crème anglaise, spun caramel and toasted almond praline.

The Most Elegant Dessert in French Cuisine

Île flottante — floating island — is one of the crown jewels of French patisserie. Gossamer-light meringue, poached to cloud-like perfection, set adrift on a pool of the most silky vanilla crème anglaise imaginable. Finished with shards of spun caramel and a scattering of toasted almond praline, this is a dessert of theatrical elegance and extraordinary lightness.

You will find this on the menus of the finest brasseries in Paris and on the tasting menus of Michelin-starred kitchens. The technique is precise but learnable — and the result is unlike anything else in the dessert repertoire.

This is the full professional recipe — the kind served in starred kitchens — complete with exact timings, temperatures, and the plating technique used by trained pastry chefs.

What You Will Learn

✔️ How to make the perfect Italian meringue base
✔️ The exact poaching technique for cloud-like meringue islands
✔️ How to make a silky crème anglaise without scrambling the eggs
✔️ Toasted almond praline from scratch
✔️ The art of spun caramel (cage & threads)
✔️ Michelin-standard plating technique
✔️ Chef’s secrets for achieving the perfect wobble

Ingredients

The Meringue

4 large egg whites
150g caster sugar
1 tsp white wine vinegar
Pinch of fine salt

Crème Anglaise

600ml whole milk
6 large egg yolks
120g caster sugar
1 vanilla pod

Almond Praline

100g blanched almonds
150g caster sugar
50ml water
Pinch of sea salt

Spun Caramel

200g caster sugar
100ml water

Method

01 — Almond Praline

Toast the almonds in a dry pan over medium heat until golden and fragrant. In a separate saucepan, dissolve the sugar in the water and cook without stirring to a deep amber caramel (175°C). Remove from the heat, add the almonds and a pinch of sea salt, and stir to coat. Pour immediately onto a sheet of lightly oiled parchment. Leave to cool completely, then crush with a rolling pin to a coarse, irregular rubble.

02 — Crème Anglaise

Split the vanilla pod and scrape the seeds into the milk. Heat the milk over medium heat until it just reaches a simmer. Whisk the egg yolks with the caster sugar until pale and slightly thickened. Pour the hot milk onto the yolk mixture in a slow, steady stream, whisking constantly. Return to the pan over medium-low heat. Stir continuously with a wooden spoon, reaching into the corners of the pan, until the sauce thickens and coats the back of the spoon (82°C). Do not allow it to boil. Strain immediately into a cold bowl. Chill until needed.

03 — Poached Meringue Islands

Bring a wide, deep pan of water to a gentle, barely-there simmer. Whisk the egg whites with a pinch of salt to soft peaks. Add the caster sugar in a slow, steady stream, whisking continuously to a stiff, glossy meringue. Add the white wine vinegar and whisk for a further 10 seconds. Using two large spoons, shape oval quenelles of meringue and lower gently onto the simmering water. Poach for 2–3 minutes on each side. Remove carefully with a slotted spoon onto a clean kitchen towel to drain. Refrigerate until plating.

04 — Spun Caramel

Dissolve the sugar in the water in a clean, dry saucepan. Cook without stirring to a pale amber caramel (165°C). Remove from the heat and allow to cool for 1–2 minutes until it thickens slightly and begins to thread when lifted with a fork. Working quickly over two lightly oiled rolling pins (or the back of an oiled bowl), dip a fork into the caramel and wave it rapidly back and forth to create long golden threads. Gather into a nest and use immediately.

05 — Plating

Chill your serving bowls for at least 10 minutes. Pour a generous pool of cold crème anglaise into each bowl. Float a poached meringue island in the centre. Scatter almond praline around the base of the meringue and directly onto the anglaise. Crown the meringue with a small nest of spun caramel threads. Serve immediately — the caramel will soften within minutes.

Chef’s Note — The Anglaise Temperature

82°C is the sweet spot. Below it the sauce is too thin; above it the yolks begin to scramble. Use a digital thermometer and pull the pan from the heat a degree or two before it arrives — residual heat does the rest.

Chef’s Note — Meringue Water Temperature

The water must never actually boil. A rolling boil will batter the meringue and cause it to break apart. Keep it at the gentlest simmer — a few lazy bubbles rising to the surface is exactly right.

Chef’s Note — Caramel Timing

Spin the caramel at the very last moment, directly before service. Even a few minutes at room temperature will cause the threads to absorb moisture from the air and collapse. Practice the spinning motion before the caramel is ready.

⭐ Michelin Star Series

Also in the Series

Valrhona Chocolate Délice · Liquorice & Carrot Composed Plate · More coming soon

All Recipes →

Disclosure: This post may contain affiliate links. All Cookings earns a small commission at no extra cost to you.

Posted on 1 Comment

Lemon Tart Recipe with Italian Meringue — French Patisserie at Home

★ 5-Star Dessert Series ★

Lemon Tart with Italian Meringue

Intensely sharp lemon curd in a buttery pastry shell, crowned with billowing torched Italian meringue.

⏱ Prep: 1 hour  ·  ⏲ Chill: 3 hours  ·  🍋 Serves: 8  ·  ⭐ Difficulty: Advanced

The Perfect Balance of Sharp and Sweet

The great lemon tart is a study in contrasts. The filling must be bracingly sharp — not timid, not sweet, but properly mouth-puckering with the brightness of fresh lemons. The pastry must be impossibly buttery and short. And the Italian meringue, piped in dramatic peaks and kissed with a blowtorch, must be silky, glossy and sweet enough to balance the acidity below.

This is the version that wins awards. Sharp, beautiful and technically impeccable.


Ingredients

Pâte Sucrée

200g plain flour
100g unsalted butter, cold
80g icing sugar
2 egg yolks
1 tsp vanilla extract
Pinch of sea salt

Lemon Curd Filling

Zest of 4 unwaxed lemons
250ml fresh lemon juice
200g caster sugar
4 large eggs + 2 yolks
150g unsalted butter, cubed
1 tbsp cornflour

Italian Meringue

4 egg whites
240g caster sugar
80ml water
Pinch of cream of tartar

The Method

Step 1. Make pâte sucrée: pulse flour, sugar and salt. Add cold butter, pulse to breadcrumbs. Add yolks and vanilla, pulse until dough just comes together. Wrap and refrigerate 1 hour.

Step 2. Roll to 3mm. Line a 23cm tart tin. Blind bake at 180°C for 15 minutes with baking beans. Remove beans, egg wash, bake 8 more minutes until golden. Cool.

Step 3. For the filling: whisk lemon juice, zest, sugar, eggs, yolks and cornflour in a heavy pan. Cook over medium heat, stirring constantly, until thick and bubbling — about 8 minutes.

Step 4. Remove from heat. Whisk in cold butter cubes one at a time until glossy. Pass through a fine sieve. Pour into tart shell. Refrigerate minimum 3 hours until perfectly set.

Step 5 — Italian Meringue. Heat sugar and water to exactly 121°C (soft ball stage). Meanwhile, whisk egg whites with cream of tartar to soft peaks. With mixer running, pour hot syrup down the side of the bowl in a thin stream. Whisk on high until thick, glossy and completely cool — about 8 minutes.

Step 6. Transfer meringue to a piping bag fitted with a Saint-Honoré or large star nozzle. Pipe in dramatic peaks across the tart surface.

Step 7 — The Torch. Using a kitchen blowtorch, toast the meringue peaks to deep golden brown. Work quickly in sweeping motions. Garnish with lemon zest curls and micro herbs. Serve immediately.

Chef’s Secrets

01 — The Acidity

Do not be afraid of sharpness. The lemon curd should make you wince slightly. The Italian meringue provides the sweetness that makes the contrast sing.

02 — The Syrup Temperature

Italian meringue must reach exactly 121°C. This pasteurises the egg whites and creates a stable meringue that holds perfectly for hours.

03 — The Sieve

Always pass the lemon curd through a fine sieve. This removes any cooked egg and creates that impossibly smooth, glossy surface that defines a great tart.

Disclosure: This post may contain affiliate links. All Cookings earns a small commission at no extra cost to you.

Posted on

Strawberry Millefeuille Recipe with Vanilla Crème Pâtissière

★ 5-Star Dessert Series ★

Strawberry Millefeuille with Vanilla Crème Pâtissière

Shattering layers of caramelised puff pastry, cloud-soft vanilla cream and the finest summer strawberries.

⏱ Prep: 1 hour  ·  ⏲ Chill: 2 hours  ·  🍓 Serves: 6  ·  ⭐ Difficulty: Advanced

The Art of the Millefeuille

The millefeuille — meaning a thousand leaves — is one of the most celebrated desserts in French patisserie. Three precise layers of caramelised, shatteringly crisp puff pastry are sandwiched with silky vanilla crème pâtissière and crowned with perfectly ripe strawberries. Every element must be made with care. Every layer must be even. The result is nothing short of extraordinary.

This recipe is the version served in the great Parisian patisseries — precise, elegant, and utterly unforgettable.


Ingredients

Puff Pastry

500g all-butter puff pastry
80g icing sugar
Pinch of fine sea salt

Crème Pâtissière

500ml whole milk
1 vanilla pod, split
6 egg yolks
120g caster sugar
40g cornflour
50g unsalted butter
200ml double cream, whipped

Strawberries & Finish

500g fresh strawberries
2 tbsp strawberry jam, warmed
Icing sugar for dusting
Fresh mint leaves
Edible gold leaf (optional)

The Method

Step 1. Preheat oven to 200°C. Roll puff pastry to 3mm thickness. Cut into three equal rectangles approximately 10x30cm. Place on lined baking trays, prick all over with a fork and refrigerate 30 minutes.

Step 2. Dust pastry generously with icing sugar. Bake 18–22 minutes until deeply golden and caramelised. The sugar will form a glass-like crust. Cool completely on a wire rack.

Step 3. For the crème pâtissière: heat milk with vanilla pod and seeds to just below a simmer. Whisk egg yolks, sugar and cornflour together until pale. Pour hot milk over egg mixture in a slow stream, whisking constantly.

Step 4. Return to pan. Cook over medium heat, stirring constantly, until thick and bubbling — about 3 minutes. Remove from heat, beat in cold butter. Press cling film directly onto surface. Chill completely.

Step 5. Whip double cream to soft peaks. Fold gently into chilled crème pâtissière to create a light, airy diplomat cream. Transfer to a piping bag fitted with a large round nozzle.

Step 6. Hull and halve strawberries. Brush with warm jam to glaze.

Step 7. Place first pastry layer on serving board. Pipe diplomat cream in neat rows. Arrange strawberries. Repeat with second layer.

Step 8 — The Finish. Place final pastry layer on top. Dust with icing sugar. Garnish with whole strawberries, mint and gold leaf. Slice immediately with a hot serrated knife for clean cuts.

Chef’s Secrets

01 — The Caramel Crust

Dust pastry with icing sugar twice during baking for maximum caramelisation. The result is a glass-like crust that shatters beautifully on the fork.

02 — The Cream

The crème pâtissière must be completely cold before folding in the whipped cream. Warm custard will deflate the cream and ruin the texture.

03 — Assembly Timing

Assemble no more than 2 hours before serving. The pastry will soften if left too long — you want that shatter when you cut through.

Disclosure: This post may contain affiliate links. All Cookings earns a small commission at no extra cost to you.