Posted on

Rose & Lychee Croissant Tart — The Laminated Luxury Series

The Laminated Luxury Series — No. 5 of 8

The croissant tart is the series at its most unexpected. The laminated dough is not rolled and shaped — it is pressed into a tart ring, where it bakes into a shell of extraordinary crunch and layering. The filling is a rose-lychee mousse: pale pink, intensely floral, with the delicate sweetness of lychee running beneath the rose like a second perfume.

Crystallised rose petals and lychee pearls finish it. This is the most feminine pastry in the series — and one of the most technically precise.


Chef’s Note

Rose water is assertive. A heavy hand turns this mousse into soap. Use 1 teaspoon maximum and taste before adding more — the rose should be present but not dominant. The lychee provides the sweetness; the rose provides the fragrance. They are partners, not rivals.

The croissant shell must be blind-baked with weights before filling. Without this step, the base will puff and buckle, leaving no room for the mousse.


Ingredients

The Croissant Tart Shell

  • 500g strong bread flour
  • 10g fine sea salt
  • 80g caster sugar
  • 10g instant yeast
  • 300ml whole milk, cold
  • 30g unsalted butter, softened
  • 280g European-style unsalted butter (84% fat), cold — for lamination

Rose-Lychee Mousse

  • 400g canned lychees, drained (reserve 80ml syrup)
  • 1 tsp rose water
  • 3 leaves platinum-grade gelatine, bloomed in cold water
  • 250ml double cream, whipped to soft peaks
  • 2 tbsp icing sugar
  • 1–2 drops natural pink food colouring (optional)

To Finish

  • Fresh rose petals, crystallised with egg white and caster sugar
  • 6–8 lychees, halved
  • Edible gold dust

Method

Laminate the dough over two days. Line a 20cm tart ring with the rolled dough to 4mm, blind bake at 185°C (fan) with weights for 18 minutes, then a further 8 minutes uncovered. Cool completely. Blend lychees with reserved syrup, sieve, dissolve bloomed gelatine in warmed purée, combine with rose water and icing sugar. Cool to light gel stage, then fold in whipped cream. Pour into the cooled shell. Refrigerate 3 hours minimum. Top with lychees, crystallised petals, and gold dust before serving.


The Laminated Luxury Series

No. 4 — Black Sesame Paris-Brest  |  You are reading No. 5 — Rose & Lychee Croissant Tart
Next: No. 6 — Cardamom & Burnt Caramel Cruffin →


🖤 Want All 8 Recipes in One Place?

The complete Laminated Luxury Series — all 8 Michelin-level croissant recipes, technique notes, plating guides, and photography direction — is available as a premium recipe collection in our shop.

Browse the Shop →

Posted on 1 Comment

Lemon Tart Recipe with Italian Meringue — French Patisserie at Home

★ 5-Star Dessert Series ★

Lemon Tart with Italian Meringue

Intensely sharp lemon curd in a buttery pastry shell, crowned with billowing torched Italian meringue.

⏱ Prep: 1 hour  ·  ⏲ Chill: 3 hours  ·  🍋 Serves: 8  ·  ⭐ Difficulty: Advanced

The Perfect Balance of Sharp and Sweet

The great lemon tart is a study in contrasts. The filling must be bracingly sharp — not timid, not sweet, but properly mouth-puckering with the brightness of fresh lemons. The pastry must be impossibly buttery and short. And the Italian meringue, piped in dramatic peaks and kissed with a blowtorch, must be silky, glossy and sweet enough to balance the acidity below.

This is the version that wins awards. Sharp, beautiful and technically impeccable.


Ingredients

Pâte Sucrée

200g plain flour
100g unsalted butter, cold
80g icing sugar
2 egg yolks
1 tsp vanilla extract
Pinch of sea salt

Lemon Curd Filling

Zest of 4 unwaxed lemons
250ml fresh lemon juice
200g caster sugar
4 large eggs + 2 yolks
150g unsalted butter, cubed
1 tbsp cornflour

Italian Meringue

4 egg whites
240g caster sugar
80ml water
Pinch of cream of tartar

The Method

Step 1. Make pâte sucrée: pulse flour, sugar and salt. Add cold butter, pulse to breadcrumbs. Add yolks and vanilla, pulse until dough just comes together. Wrap and refrigerate 1 hour.

Step 2. Roll to 3mm. Line a 23cm tart tin. Blind bake at 180°C for 15 minutes with baking beans. Remove beans, egg wash, bake 8 more minutes until golden. Cool.

Step 3. For the filling: whisk lemon juice, zest, sugar, eggs, yolks and cornflour in a heavy pan. Cook over medium heat, stirring constantly, until thick and bubbling — about 8 minutes.

Step 4. Remove from heat. Whisk in cold butter cubes one at a time until glossy. Pass through a fine sieve. Pour into tart shell. Refrigerate minimum 3 hours until perfectly set.

Step 5 — Italian Meringue. Heat sugar and water to exactly 121°C (soft ball stage). Meanwhile, whisk egg whites with cream of tartar to soft peaks. With mixer running, pour hot syrup down the side of the bowl in a thin stream. Whisk on high until thick, glossy and completely cool — about 8 minutes.

Step 6. Transfer meringue to a piping bag fitted with a Saint-Honoré or large star nozzle. Pipe in dramatic peaks across the tart surface.

Step 7 — The Torch. Using a kitchen blowtorch, toast the meringue peaks to deep golden brown. Work quickly in sweeping motions. Garnish with lemon zest curls and micro herbs. Serve immediately.

Chef’s Secrets

01 — The Acidity

Do not be afraid of sharpness. The lemon curd should make you wince slightly. The Italian meringue provides the sweetness that makes the contrast sing.

02 — The Syrup Temperature

Italian meringue must reach exactly 121°C. This pasteurises the egg whites and creates a stable meringue that holds perfectly for hours.

03 — The Sieve

Always pass the lemon curd through a fine sieve. This removes any cooked egg and creates that impossibly smooth, glossy surface that defines a great tart.

Disclosure: This post may contain affiliate links. All Cookings earns a small commission at no extra cost to you.

Posted on

Strawberry Millefeuille Recipe with Vanilla Crème Pâtissière

★ 5-Star Dessert Series ★

Strawberry Millefeuille with Vanilla Crème Pâtissière

Shattering layers of caramelised puff pastry, cloud-soft vanilla cream and the finest summer strawberries.

⏱ Prep: 1 hour  ·  ⏲ Chill: 2 hours  ·  🍓 Serves: 6  ·  ⭐ Difficulty: Advanced

The Art of the Millefeuille

The millefeuille — meaning a thousand leaves — is one of the most celebrated desserts in French patisserie. Three precise layers of caramelised, shatteringly crisp puff pastry are sandwiched with silky vanilla crème pâtissière and crowned with perfectly ripe strawberries. Every element must be made with care. Every layer must be even. The result is nothing short of extraordinary.

This recipe is the version served in the great Parisian patisseries — precise, elegant, and utterly unforgettable.


Ingredients

Puff Pastry

500g all-butter puff pastry
80g icing sugar
Pinch of fine sea salt

Crème Pâtissière

500ml whole milk
1 vanilla pod, split
6 egg yolks
120g caster sugar
40g cornflour
50g unsalted butter
200ml double cream, whipped

Strawberries & Finish

500g fresh strawberries
2 tbsp strawberry jam, warmed
Icing sugar for dusting
Fresh mint leaves
Edible gold leaf (optional)

The Method

Step 1. Preheat oven to 200°C. Roll puff pastry to 3mm thickness. Cut into three equal rectangles approximately 10x30cm. Place on lined baking trays, prick all over with a fork and refrigerate 30 minutes.

Step 2. Dust pastry generously with icing sugar. Bake 18–22 minutes until deeply golden and caramelised. The sugar will form a glass-like crust. Cool completely on a wire rack.

Step 3. For the crème pâtissière: heat milk with vanilla pod and seeds to just below a simmer. Whisk egg yolks, sugar and cornflour together until pale. Pour hot milk over egg mixture in a slow stream, whisking constantly.

Step 4. Return to pan. Cook over medium heat, stirring constantly, until thick and bubbling — about 3 minutes. Remove from heat, beat in cold butter. Press cling film directly onto surface. Chill completely.

Step 5. Whip double cream to soft peaks. Fold gently into chilled crème pâtissière to create a light, airy diplomat cream. Transfer to a piping bag fitted with a large round nozzle.

Step 6. Hull and halve strawberries. Brush with warm jam to glaze.

Step 7. Place first pastry layer on serving board. Pipe diplomat cream in neat rows. Arrange strawberries. Repeat with second layer.

Step 8 — The Finish. Place final pastry layer on top. Dust with icing sugar. Garnish with whole strawberries, mint and gold leaf. Slice immediately with a hot serrated knife for clean cuts.

Chef’s Secrets

01 — The Caramel Crust

Dust pastry with icing sugar twice during baking for maximum caramelisation. The result is a glass-like crust that shatters beautifully on the fork.

02 — The Cream

The crème pâtissière must be completely cold before folding in the whipped cream. Warm custard will deflate the cream and ruin the texture.

03 — Assembly Timing

Assemble no more than 2 hours before serving. The pastry will soften if left too long — you want that shatter when you cut through.

Disclosure: This post may contain affiliate links. All Cookings earns a small commission at no extra cost to you.

Posted on 1 Comment

Valrhona Chocolate Délice Recipe — Michelin Star Chocolate Tart with Gold Leaf

★ Michelin Star Series ★

Valrhona Chocolate Délice with Raspberry Coulis & Gold Leaf

The silkiest, most intensely chocolatey dessert in fine dining — perfected for the home kitchen.

⏱ Prep: 45 mins  ·  ⏲ Chill: 4 hours  ·  🍫 Serves: 8  ·  ⭐ Difficulty: Advanced

Valrhona Chocolate Delice hero
Valrhona Chocolate Délice — the defining dessert of 1 Michelin star dining. Silky, intense, immaculate.

What is a Chocolate Délice?

A chocolate délice is the jewel of the fine dining dessert trolley. The word délice means delight in French — and this dessert earns that name in every possible way. It is a set chocolate ganache tart of extraordinary silkiness, made with the finest dark chocolate, double cream and a whisper of sea salt, poured into a buttery sweet pastry shell and chilled until it trembles.

You will find this dessert on the menus of Michelin-starred restaurants across Paris, London and New York — plated with mathematical precision, finished with edible gold leaf, and accompanied by a vivid raspberry coulis that cuts through the richness with electric acidity.

Today I am going to show you how to make it at home — with the exact technique, the exact ratios, and the exact finishing touches that separate a délice from every other chocolate dessert.

⭐ Why This Recipe

✔️ Michelin star technique
✔️ Valrhona 70% chocolate
✔️ Perfect for dinner parties
✔️ Make-ahead friendly
✔️ Restaurant plating guide
✔️ Raspberry coulis included
✔️ Gold leaf finishing touch
✔️ Gluten-free option included


Ingredients

Pâte Sucrée

200g plain flour
100g unsalted butter, cold & cubed
80g icing sugar, sifted
2 large egg yolks
1 tsp vanilla extract
Pinch of fine sea salt
2–3 tbsp ice cold water

Chocolate Délice Filling

300g Valrhona 70% dark chocolate
300ml double cream
50ml whole milk
3 large eggs, room temperature
50g unsalted butter, softened
1 tsp flaky sea salt (Maldon)
1 tsp vanilla bean paste

Raspberry Coulis & Finish

250g fresh raspberries
50g caster sugar
1 tbsp lemon juice
Edible gold leaf sheets
Fresh raspberries
Micro herbs
Flaky sea salt crystals

Valrhona Chocolate Delice slice with gold leaf
The ganache must be poured at exactly 35°C — the most critical step in the entire recipe.

The Method

Step 1. In a food processor, pulse the flour, icing sugar and salt together. Add the cold cubed butter and pulse until the mixture resembles fine breadcrumbs.

Step 2. Add the egg yolks and vanilla. Pulse until just coming together. Wrap in cling film and refrigerate for 1 hour minimum.

Step 3. Preheat oven to 180°C. Roll pastry to 3mm thickness. Line a 23cm tart tin and blind bake with baking beans for 15 minutes. Egg wash, then bake 8 more minutes until golden. Cool completely.

Step 4. Heat cream and milk to just below a simmer. Pour over chopped Valrhona chocolate in three additions, stirring from the centre outward each time.

Step 5. Cool ganache to exactly 35°C. Add whisked eggs, softened butter, vanilla paste and sea salt. Stir until completely silky and smooth.

Step 6. Reduce oven to 110°C. Pour filling into the cooled tart shell. Bake 20–25 minutes — the outer 4cm should be set but the centre must still wobble like barely-ripe jelly.

Step 7. Cool 30 minutes then refrigerate uncovered for a minimum of 4 hours. Overnight gives the best texture.

Step 8. For coulis: cook raspberries, sugar and lemon juice for 5–7 minutes. Pass through a fine sieve. Cool and refrigerate.

Step 9. Slice with a hot knife wiped clean between every cut. Place the slice off-centre on a warm white plate.

Step 10 — Michelin Plating. Create three descending pools of coulis alongside the slice. Place gold leaf with tweezers. Finish with three Maldon crystals and one micro herb.

Chef’s Secrets

01 — Temperature

The filling must be poured at exactly 35°C. Too hot and it cooks the eggs. Too cold and it sets before levelling. Use a digital thermometer — it is non-negotiable.

02 — The Wobble

Ready when the outer 4cm is set and the centre wobbles like barely-ripe jelly. If it ripples all the way to the edge it needs more time.

03 — The Plating

Gold leaf placed with tweezers. Three pools of coulis descending in size. Slice placed off-centre. Three Maldon crystals. One micro herb.

The Professional Kitchen Toolkit

🍫 Valrhona 70% Chocolate
View on Amazon →

🥧 Loose-Bottomed Tart Tin
View on Amazon →

🌡️ Digital Thermometer
View on Amazon →

🥊 Fine Mesh Sieve
View on Amazon →

Edible Gold Leaf Sheets
View on Amazon →

🧰 Plating Tweezers
View on Amazon →

Disclosure: This post contains affiliate links. All Cookings earns a small commission at no extra cost to you.

Posted on

Fresh Fig Tart Recipe with Almond Frangipane — Elegant Spiral Design

Petals of perfection, a labor of love in every spiral. This fresh fig tart brings together art and flavor.

This stunning fresh fig tart features a buttery crust, a creamy almond frangipane filling, fig jam, and thinly sliced fresh figs arranged in an elegant spiral or rose pattern, finished with a glossy glaze. The image shows a beautiful, intricate design with overlapping fig slices creating swirling patterns and a shiny, caramelized top—likely achieved by baking the figs into the filling and brushing with a glaze like apricot jam or honey afterward.
This style is inspired by classic French tarte aux figues. Here’s a full, detailed recipe adapted for a 9-10 inch (23-25 cm) tart that closely matches the visual. It serves 8-12.
Ingredients
For the pâte sucrée (sweet tart crust):
1 ½ cups (190g) all-purpose flour
½ cup (60g) powdered sugar
¼ tsp salt
½ cup (115g) unsalted butter, cold and cubed
1 large egg yolk
1-2 tbsp ice water (if needed)
For the filling:
½ cup (120g) fig jam (or apricot jam as substitute)
Frangipane (almond cream):
½ cup (115g) unsalted butter, softened
½ cup (100g) granulated sugar
1 cup (100g) almond flour
2 large eggs, room temperature
1 tsp vanilla extract
½ tsp almond extract (optional)
2 tbsp all-purpose flour
Pinch of salt
For the topping:
10-15 fresh ripe figs (depending on size), stems removed
2-3 tbsp honey or apricot jam (for glaze)
1-2 tsp lemon juice
Optional: a sprinkle of chopped pistachios or a few rosemary leaves for garnish
Instructions
Make the tart crust:
In a food processor, pulse flour, powdered sugar, and salt. Add cold butter and pulse until it resembles coarse crumbs (pea-sized pieces).
Add egg yolk and pulse until the dough just comes together. Add ice water 1 tsp at a time if too dry.
Turn out onto a lightly floured surface, shape into a disk, wrap in plastic, and chill for at least 1 hour (or up to 2 days).
Blind bake the crust:
Preheat oven to 375°F (190°C).
Roll out the chilled dough to about ⅛-inch thick and fit into a 9-10 inch tart pan with removable bottom. Trim edges and prick the base with a fork.
Line with parchment paper and fill with pie weights or dried beans. Bake for 15 minutes.
Remove weights and parchment, then bake another 5-10 minutes until lightly golden. Cool completely.
Prepare the frangipane:
Cream softened butter and sugar until light and fluffy (2-3 minutes).
Add eggs one at a time, beating well after each. Mix in vanilla and almond extract.
Fold in almond flour, all-purpose flour, and salt until smooth and creamy.
Assemble the tart:
Spread a thin, even layer of fig jam over the cooled crust.
Spread the frangipane filling evenly over the jam, leaving a small border.
Thinly slice the fresh figs (about ⅛-inch thick slices, lengthwise or crosswise for variety in color and shape).e97092
Create the spiral/rose design:
Arrange the fig slices starting from the outer edge, overlapping them slightly in a circular pattern with the cut sides facing up. Work inward in concentric circles or gentle spirals, tucking slices to form the swirling, rose-like effect seen in your image. The darker purple skins and pink interiors create beautiful contrast.
For extra gloss during baking, lightly brush slices with a bit of honey mixed with lemon juice.
Bake:
Bake at 350°F (175°C) for 35-45 minutes, until the frangipane is puffed, golden, and set, and the figs are softened and caramelized at the edges. The top should develop a glossy, slightly sticky sheen.
Glaze and finish:
While still warm, gently brush the figs with warmed apricot jam or honey (thinned with a splash of water or lemon juice) for that high-shine finish.
Cool on a wire rack. Optional: dust lightly with powdered sugar or add chopped nuts just before serving.
Serving Suggestions
Serve at room temperature or slightly warm. Pair with vanilla ice cream, whipped cream, or crème fraîche. It keeps well covered in the fridge for 2-3 days, though the crust is best the day it’s made.
Tips for Success
Use ripe but firm figs for the best slices—they hold shape better when thin.
The spiral design takes patience but creates the wow factor. Practice overlapping for the braided/swirled look.
For a quicker version, use store-bought puff pastry or shortcrust and a simple cream cheese or mascarpone base instead of full frangipane.
Blind baking prevents a soggy bottom, especially with the juicy figs.
This recipe yields a professional-looking tart with balanced sweetness, nutty almond notes, and fresh fig flavor. Enjoy baking it—your version looks bakery-worthy! If you have a preferred crust type (e.g., puff pastry) or dietary tweaks, let me know for adjustments.

Posted on

French Apple Tart Recipe — Classic & Allergy-Friendly Version

Looking for a delicious apple tart that fits every diet? This easy recipe has a gluten free, nut free, and dairy free version.

This classic French style apple tart features thin, tender apple slices arranged over a buttery, flaky pastry, finished with a glossy apricot glaze.

It requires roughly 25 minutes of prep and 40 minutes of baking, serving 8 people. The key to elegant dessert, is layering apple slices to create a beautiful, caramelized, rustic look.

RECIPE

Pastry

  • 275g plain flour
  • 175g cold butter, cubed
  • 1 tbsp caster sugar
  • 50ml cold water (approx.)

Filling and glaze

  • 5-6 large cooking apples
  • 100g caster sugar
  • 1 egg (for wash)
  • 2 tbsp apricot jam (for glaze)

Instructions

  1. Prepare Dough: Combine flour and sugar, then rub in cold butter until it looks like breadcrumbs. Mix in cold water until a dough forms. Chill for 30 minutes.
  2. Prepare Apples: Peel, core, and slice the apples thinly (about 1/8 to 1/2 inch).
  3. Assemble: Preheat oven to 200°C (390°F). Roll out the pastry and place it into a tart tin. Arrange apples in concentric circles or overlapping rows.
  4. Bake: Sprinkle with sugar. Bake for 40 minutes until golden brown.
  5. Glaze: Melt apricot jam with a little water, then brush over the warm apples for a shiny finish.

Tip

Use a mix of sweet and sour apples to balance the flavor, and bake at 400°F (200°C) initially to set the crust before lowering to 350°F (175°C) for calamelization.

Key Dairy – free Substitutes (Vegan apple tart)

For pastry: use a firm vegan butter block in a 1:1 ratio for the diary butter. Cold coconut oil(solid state) also works well for a very crisp, short texture.

For the Egg: Brush the pastry edges with a mixture of non-dairy milk like almond or soy, and a splash of maple syrup or agave to achieve a golden, shiny finish without eggs.

For the Glaze: most apricot jamsare naturally dairy-free, but ensure yours doesn’t contain hidden dairy-derived thickeners.

Tips

  • Temperature is critical: plant based butters often melt faster than dairy butter. Freeze the vegan butter for 10-15minutes before rubbing it into the flour to ensure a flaky crust.
  • Pastry handling: if the dough feels too dry when using coconut oil or vegan butter, add 1 tablespoon of ice cold water at a time until it just comes together.
  • Serving: serve the tart with a scoop of coconut milk-based vanilla ice cream or a dollop of cashew whipped cream for a fully vegan dessert experience.

Gluten – Free apple dessert recipe

Allergy friendly holiday desserts

Yields: 1 9-inch tart (8 servings)
Prep time: 30 minutes (plus 1 hour chilling)
Bake time: 45–55 minutes

  1. Ingredients
  • For the Crust:
  • 2 cups Gluten-Free All-Purpose Flour (Ensure it contains xanthan gum; if not, add ½ tsp)
  • 1 tbsp Sugar (Granulated or coconut sugar)
  • ½ tsp Salt
  • ¾ cup (12 tbsp) Cold Vegan Butter Block, cubed
  • 1 Egg (Acts as a critical binder for GF dough; use a “flax egg” for a fully vegan option, though it may be more crumbly)
  • 2–4 tbsp Ice Water (Use only as much as needed)
    For the Filling & Glaze:
  • 4–5 Large Apples (Mix Granny Smith for tartness and Gala or Honeycrisp for sweetness)
  • ¼ cup Sugar (For sprinkling)
  • 2 tbsp Apricot Jam or Jelly
  • 1 tbsp Lemon Juice (To prevent browning)
    2. Step-by-Step Instructions
  • Make the Dough: In a large bowl, whisk the flour, sugar, and salt. Cut in the cold vegan butter using a pastry cutter or fork until it resembles coarse crumbs.
  • Bind and Chill: Stir in the beaten egg. Add ice water, one tablespoon at a time, until the dough just holds together when pressed. Shape into a disc, wrap in plastic, and refrigerate for at least 1 hour to allow the GF flour to hydrate.
  • Prep the Apples: Peel, core, and slice apples into thin wedges (about ⅛ inch). Toss with lemon juice.
  • Roll the Crust: Roll the chilled dough between two sheets of parchment paper to about 12 inches in diameter. Peel off the top sheet, flip the dough into a 9-inch tart pan, and gently press it into the edges. Trim any excess.
  • Assemble: Arrange apple slices in tight, overlapping concentric circles starting from the outside. Sprinkle with sugar.
  • Bake: Bake at 375°F (190°C) for 45–55 minutes until the crust is golden and apples are tender.
  • Glaze: Melt the apricot jam with a splash of water and brush over the warm tart for a professional, glossy finish.

Troubleshooting

Continue reading French Apple Tart Recipe — Classic & Allergy-Friendly Version
Posted on

Tahitian Vanilla Mille-Feuille Croissant — The Laminated Luxury Series

The Laminated Luxury Series — No. 2 of 8

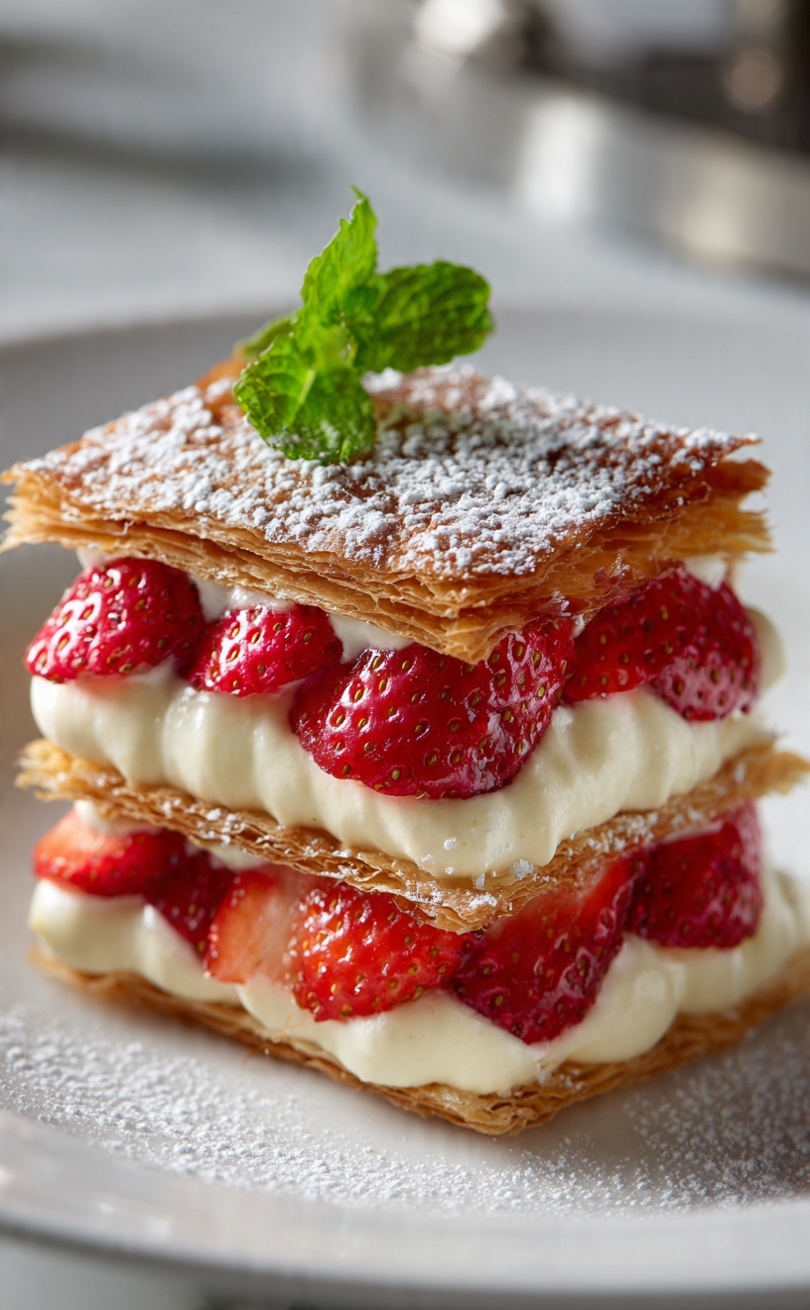
If the Noir Croissant is darkness, this is light. The Tahitian Vanilla Mille-Feuille Croissant takes the most revered ingredient in patisserie — the Tahitian vanilla bean, with its floral, cherry-like complexity — and anchors it inside shatteringly crisp laminated layers, bound together with a diplomat cream of exceptional delicacy.

Mille-feuille means a thousand leaves. Here, those leaves are croissant dough — caramelised, lacquered, and finished with edible gold dust. This is the series at its most classical.


Chef’s Note

Tahitian vanilla is not interchangeable with Madagascar vanilla. It is softer, more floral — less sharp. It perfumes the cream rather than asserting itself. Use real pods, not extract. Split them lengthways, scrape every seed, and steep the pods in the warm milk for a minimum of 20 minutes. The difference is not subtle.

The croissant layers here are baked flatter than usual — pressed lightly before baking to encourage the mille-feuille effect. The result is a pastry of extraordinary crunch and layering, designed to shatter on the first bite and yield something impossibly soft inside.


Ingredients

The Dough

  • 500g strong bread flour
  • 10g fine sea salt
  • 80g caster sugar
  • 10g instant yeast
  • 300ml whole milk, cold
  • 30g unsalted butter, softened

The Butter Block (Beurrage)

  • 280g European-style unsalted butter (84% fat), cold

Tahitian Vanilla Diplomat Cream

  • 500ml whole milk
  • 2 Tahitian vanilla pods, split and scraped
  • 5 egg yolks
  • 120g caster sugar
  • 40g cornflour
  • 30g unsalted butter, cold and cubed
  • 200ml double cream, whipped to soft peaks

Lacquer Glaze

  • 100g caster sugar
  • 30ml water
  • 1 tsp glucose syrup

To Finish

  • 1 egg yolk + 1 tbsp cream (egg wash)
  • Edible gold dust
  • Vanilla pod, halved, to garnish

Method

Day 1 — The Détrempe & Beurrage

Combine flour, salt, and sugar. Dissolve yeast in the cold milk, then combine with the dry ingredients. Add the softened butter and knead for 8 minutes until smooth and elastic. Wrap and refrigerate overnight. Shape the cold butter block into a 20cm square and refrigerate alongside the dough.

Day 2 — Lamination

Perform three double folds with 30-minute rests between each fold, keeping everything below 18°C. After the final fold, rest for at least 1 hour.

Shaping — The Mille-Feuille Method

Roll the laminated dough to 4mm. Rather than rolling into the traditional crescent shape, cut into rectangles (12cm × 8cm). Stack two rectangles per pastry with a light brushing of egg wash between them. Place on lined trays and proof at 24°C for 1.5–2 hours. Before baking, place a second sheet of parchment on top and weigh down lightly with a flat baking tray — this creates the compressed, layered mille-feuille effect.

Baking & Glazing

Preheat oven to 185°C (fan). Brush with egg wash, then bake with the weighted tray on top for 15 minutes. Remove the top tray and bake a further 8–10 minutes until deeply golden and lacquered. While still hot, brush immediately with the sugar glaze (combine sugar, water, and glucose, simmer until syrupy). The glaze will set to a glassy finish as it cools.

The Diplomat Cream

Steep the split vanilla pods in the warm milk for 20 minutes. Whisk the egg yolks with sugar and cornflour. Bring the milk back to a simmer, remove pods, then pour over the egg mixture in a steady stream. Return to the pan and cook over medium heat, whisking constantly, until thick and glossy. Remove from heat, whisk in the cold butter. Press cling film directly onto the surface and cool completely. Once cold, fold in the whipped cream in two additions to create a light, airy diplomat cream.

Assembly

Once the pastries are completely cool, split horizontally with a serrated knife. Pipe the diplomat cream generously across the base — use a large star nozzle for visual drama. Replace the top layer. Dust liberally with edible gold dust and place a halved vanilla pod across the top. Serve within 2 hours of assembly for maximum crunch.


Technique Notes

The weighted bake. Pressing the dough during baking forces the layers to caramelise against each other rather than puffing apart. The result is a pastry that is more mille-feuille than croissant — dense with crunch, not airy. Do not skip this step.

The glaze timing. The sugar glaze must go on immediately out of the oven while the surface is still hot. A cold pastry will not absorb the glaze — it will pool and remain sticky. Work quickly.

Diplomat vs. pastry cream. Diplomat cream is pastry cream lightened with whipped cream. Do not substitute with pastry cream alone — it is too dense and will overwhelm the delicate vanilla perfume. The lightness of the diplomat cream is essential to the balance of this pastry.


Facebook Caption

The Laminated Luxury Series continues.

Crisp laminated layers. Tahitian vanilla diplomat cream. Edible gold dust.

This is the Tahitian Vanilla Mille-Feuille Croissant — and it tastes exactly as extraordinary as it looks.

Full recipe on the blog. Link in bio. ✨🥐


The Laminated Luxury Series

No. 1 — Noir Croissant  |  You are reading No. 2 — Tahitian Vanilla Mille-Feuille
Next: No. 3 — Saffron & Honey Kouign-Amann →

View the full series: French Classics | Michelin Star Series


🖤 Want All 8 Recipes in One Place?

The complete Laminated Luxury Series — all 8 Michelin-level croissant recipes, technique notes, plating guides, and photography direction — is available as a premium recipe collection in our shop.

Browse the Shop →