Posted on

Jasmine & Lychee Délice — Michelin Star Spring Plated Dessert

Michelin Star Series — Spring Edition

Jasmine and lychee is one of the great perfumed pairings in fine dining — floral meeting floral, each amplifying the other without competition. This délice builds that pairing across five components: a jasmine tea ganache at the centre, surrounded by a lychee gel that sets clean and bright, lifted by a coconut dacquoise base, finished with a jasmine cream quenelle and crystallised edible jasmine flowers. It is the kind of plate that stops a dining room.

The Concept

A délice is a French term for a set ganache dessert — typically moulded, smooth-sided, and designed to be sliced or unmoulded at the table. The jasmine version works because jasmine tea, when steeped in hot cream, transfers its floral, slightly smoky character directly into the ganache without requiring any extract or flavouring. It is a completely clean technique that produces an extraordinarily refined result. The lychee gel — made from fresh lychee purée set with agar — cuts through the richness of the ganache with a precise, crystalline brightness that white chocolate alone could not achieve.

Why This Works at Michelin Level

Every element on this plate earns its place through flavour logic. The coconut dacquoise base is not merely textural — its tropical sweetness bridges the floral jasmine and the fruit-forward lychee, preventing either from feeling isolated. The jasmine cream adds a second floral layer at a different temperature and texture to the ganache, creating depth without repetition. The crystallised flowers are the visual punctuation: they signal to the diner what they are about to taste before the first bite arrives.

Ingredient Notes

Jasmine tea: Use a high-quality loose-leaf jasmine pearl or jasmine green tea. Cheaper tea bags produce a thin, slightly bitter infusion. The cream steep time is 8 minutes — longer and the tannins become dominant.

White chocolate: Valrhona Opalys 33% is the correct choice here — its low sugar content and clean dairy notes let the jasmine infusion lead. Standard supermarket white chocolate will overwhelm the floral notes with sweetness.

Lychee: Fresh lychees produce a cleaner, more vibrant purée than canned. If using canned, drain thoroughly and blend with a small squeeze of fresh lime juice to restore brightness.

Agar agar: Used instead of gelatin for the lychee gel — it sets firmer and cleaner, produces a more precise cut edge, and is suitable for vegetarian and vegan guests.

Edible jasmine flowers: Source food-grade, unsprayed. Rinse gently and dry on kitchen paper before plating. Crystallised in egg white and caster sugar, they hold their shape for up to 48 hours.

Ingredients

Jasmine Tea Ganache

  • 200ml heavy cream (35% fat)
  • 12g loose-leaf jasmine pearl tea
  • 220g Valrhona Opalys 33% white chocolate, finely chopped
  • 30g unsalted butter, softened
  • Pinch of fine sea salt

Lychee Gel

  • 300g fresh lychee purée (approximately 20 lychees, peeled, stoned, blended and strained)
  • 30g caster sugar
  • 2g agar agar powder
  • 1 tsp fresh lime juice

Coconut Dacquoise

  • 3 egg whites, room temperature
  • 80g caster sugar
  • 60g desiccated coconut, finely ground
  • 40g ground almonds
  • 20g icing sugar
  • Pinch of fine sea salt

Jasmine Cream

  • 200ml heavy cream, cold
  • 8g loose-leaf jasmine pearl tea
  • 20g icing sugar
  • 2g gelatin sheets, bloomed

Crystallised Jasmine Flowers

  • 12–16 food-grade jasmine flowers, rinsed and dried
  • 1 egg white, lightly beaten
  • 60g caster sugar

Method

Day 1 — Crystallised Flowers

Brush each jasmine flower gently with egg white using a fine pastry brush — coat both sides evenly. Dust lightly with caster sugar and place on a wire rack. Leave at room temperature for 24 hours until stiff and glittering. Store in an airtight container.

Day 1 — Jasmine Tea Ganache

Heat cream to 80°C — do not boil. Add jasmine tea, stir briefly, cover and steep for exactly 8 minutes. Strain through a fine sieve, pressing gently on the leaves. Weigh the infused cream and top back up to 200ml with fresh cream if needed. Pour over the chopped white chocolate in three additions, stirring from the centre out with each addition. Add softened butter and sea salt. Blitz briefly with a hand blender for a glossy emulsion. Pour into individual silicone dome moulds or a lined 15cm square tin to a depth of 2cm. Refrigerate overnight.

Day 1 — Lychee Gel

Combine lychee purée, caster sugar, and agar agar in a small saucepan. Bring to a full boil, stirring constantly, and boil for 90 seconds. Remove from heat, add lime juice, and pour into a flat container to a depth of 5mm. Refrigerate until fully set — approximately 1 hour. Once set, cut into precise 3cm rounds or squares using a sharp cutter. Reserve on a tray lined with cling film.

Day 2 — Coconut Dacquoise

Preheat oven to 170°C (fan). Combine ground coconut, ground almonds, and icing sugar in a bowl. Whisk egg whites with salt to soft peaks, then add caster sugar gradually, whisking to a stiff, glossy meringue. Fold the dry ingredients through in two additions using a large spatula — work quickly and do not overwork. Spread to 5mm thickness on a lined baking tray. Bake for 14–16 minutes until lightly golden and just firm to the touch. Cool completely, then cut to match the base of your ganache portions.

Day 2 — Jasmine Cream

Heat 80ml of the cream to 80°C. Add jasmine tea, steep 8 minutes, strain. Squeeze excess water from bloomed gelatin and dissolve into the warm infused cream. Add remaining cold cream and icing sugar. Refrigerate until cold — at least 2 hours. Whip to soft peaks. Transfer to a piping bag fitted with a small round or Saint-Honoré tip.
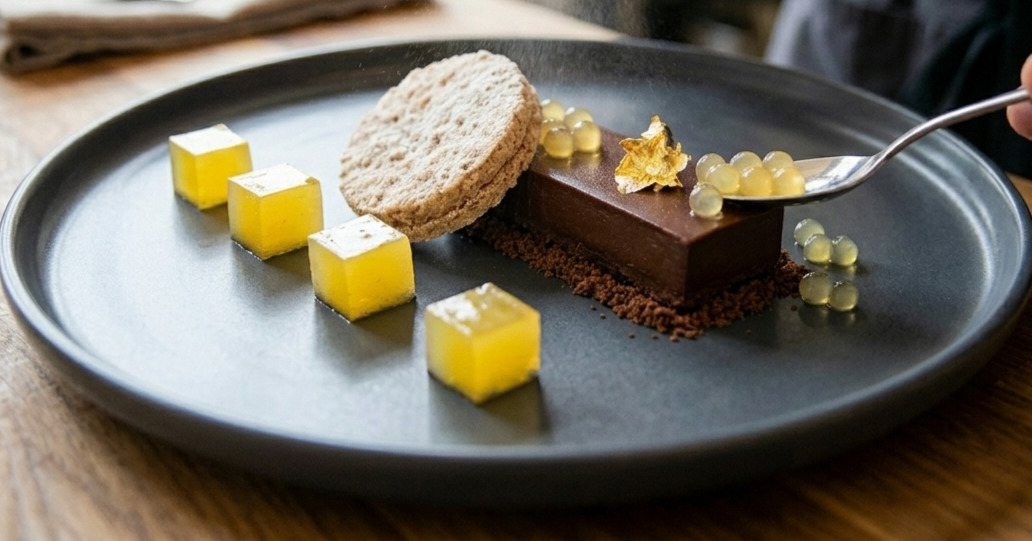
Assembly & Plating

Unmould or cut the set ganache into clean portions. Place a dacquoise base on the plate and set the ganache on top. Position the lychee gel disc alongside — not on top — so its colour reads separately. Pipe a quenelle of jasmine cream beside the ganache. Place three crystallised jasmine flowers at considered points across the plate. Finish with a very light dusting of icing sugar if desired — keep the plate clean and uncluttered.

Serving & Storage

Serve the ganache at just below room temperature — remove from the refrigerator 15 minutes before plating. Cold ganache loses its silky mouthfeel and the jasmine aroma becomes muted. The assembled plate holds for up to 20 minutes before the dacquoise begins to absorb moisture from the gel.

Components can be made up to 2 days in advance and stored separately in the refrigerator. The crystallised flowers keep for up to 48 hours in an airtight container at room temperature.

Frequently Asked Questions

Can I use gelatin instead of agar for the lychee gel? Agar is strongly recommended here — it produces a cleaner cut edge and a slightly firmer texture that holds on the plate. Gelatin sets softer and the disc may lose its shape at room temperature. If using gelatin, use 3 sheets and do not boil.

Where can I find food-grade jasmine flowers? Specialist tea suppliers, Middle Eastern grocery stores, and online edible flower suppliers. Never use flowers from a florist or garden centre — these are treated with pesticides not suitable for consumption.

Can I substitute the white chocolate? Valrhona Opalys is ideal but any high-quality white couverture (31% cocoa butter minimum) will work. Avoid compound white chocolate — it contains vegetable fat rather than cocoa butter and will not emulsify correctly.

Can the dacquoise be made gluten-free? It already is — there is no flour in the recipe. Dacquoise is naturally gluten-free.

Chef’s Note

The 8-minute steep is precise for a reason. Under-steep and the jasmine is a whisper; over-steep and the tannins from the green tea base become bitter and angular. Set a timer. Taste the cream before it goes over the chocolate — it should smell and taste unmistakably of jasmine, clean and floral, with no bitterness at the back of the throat.

Explore more Michelin Star Series recipes on allcookings.com — including the Earl Grey & Yuzu Texture Study and the Complete Michelin Star Guide.


Part of the Michelin Star Series — restaurant-quality plated desserts for the home kitchen, by allcookings.com

Posted on

The Art of Tempering Chocolate — From Bean to Gloss

★ Technique Deep-Dive ★

The Art of Tempering Chocolate

Perfect Snap  ·  Mirror Gloss  ·  Silky Melt

Tempering is the single technique that separates professional chocolate work from everything else. It is not complicated — but it is precise. Master it once and every chocolate shell, bonbon, and dipped dessert you make will look and taste like it came from a Michelin-starred kitchen.

⏱ Time: 30–45 mins  ·  🌡 Precision required  ·  ⭐ Difficulty: Intermediate

Why Tempered Chocolate Is Different

Break a piece of good chocolate and listen. That clean, sharp snap — followed by a melt that coats your tongue without a trace of grease — is not an accident. It is the result of tempered chocolate: chocolate whose cocoa butter crystals have been aligned into a precise, stable formation called Form V (Beta crystals).

Untempered chocolate, by contrast, sets with a dull, streaky finish, a waxy or grainy texture, and a melt that feels thick and heavy. This is what happens when you melt chocolate and simply let it cool — the cocoa butter crystallises randomly, forming an unstable structure. Tempering is the process of deliberately guiding the chocolate through a precise temperature curve to force only the correct crystals to form.

The result: a mirror gloss, a definitive snap, and a clean, rapid melt on the palate. Every professional chocolate shell, enrobed truffle, and moulded bonbon depends on this one technique.

What You Will Learn

✔️ The science behind tempering — why it works and what goes wrong
✔️ The three critical temperatures for dark, milk and white chocolate
✔️ Three tempering methods: tabling, seeding, and microwave
✔️ How to test your temper before committing
✔️ How to rescue chocolate that has gone out of temper


The Science in 60 Seconds

Cocoa butter can crystallise into six different forms (Form I through Form VI). Only Form V produces the glossy, snapping, stable chocolate we want. The tempering process works by:

01 — Melt

Heat the chocolate fully above 50°C to destroy all existing crystal structures. You start with a blank slate.

02 — Cool

Lower the temperature to a range where Form V crystals begin to form alongside undesirable forms. You are seeding the correct crystal structure.

03 — Reheat

Raise the temperature slightly to melt out the unstable crystals, leaving only the stable Form V. The chocolate is now in temper and ready to use.

The Temperature Chart

Dark Chocolate (70%+)

Melt to: 50–55°C
Cool to: 27–28°C
Reheat to: 31–32°C

Milk Chocolate

Melt to: 45–50°C
Cool to: 26–27°C
Reheat to: 29–30°C

White Chocolate

Melt to: 40–45°C
Cool to: 25–26°C
Reheat to: 27–28°C


Three Methods

Method 01 — Tabling (The Classic)

This is how chocolate is tempered in every professional kitchen. Melt your chocolate fully, then pour two-thirds onto a cold marble or granite surface. Using a palette knife and a bench scraper, work the chocolate continuously — spreading it out and folding it back over itself — until it thickens noticeably and reaches the cooling temperature for your chocolate type. Scrape it back into the bowl with the remaining warm third, stir thoroughly, and check the temperature. You should now be at the working temperature.

Best for: large volumes (400g+). Most control. Requires marble surface.

Method 02 — Seeding (Best for Home Use)

Melt two-thirds of your chocolate fully. Remove from heat and add the remaining one-third as finely chopped solid chocolate (or couverture callets). Stir continuously. The solid chocolate acts as a seed — it already contains stable Form V crystals, which it transfers to the melted mass as it dissolves. Keep stirring until the temperature drops to the working temperature. No marble slab required.

Best for: smaller quantities at home. Reliable and clean.

Method 03 — Microwave (The Fastest Route)

Use only with couverture callets (not chopped bars, which heat unevenly). Place callets in a microwave-safe bowl. Heat in 15-second bursts on 50% power, stirring thoroughly between each burst. Stop when approximately 75% of the callets are melted — residual heat will melt the rest. Stir until fully smooth and at the correct working temperature.

Best for: small quantities, speed. Less forgiving — use a thermometer.

Tempering chocolate — professional technique

Testing & Troubleshooting

The Knife Test

Dip the tip of a clean palette knife into your tempered chocolate and hold it for 30 seconds at room temperature. If the chocolate sets firm and glossy with no streaking, you are in temper. If it remains wet or sets dull, you are not.

Bloom — What Went Wrong

White streaks or a grey, matte surface after setting = fat bloom. The cocoa butter separated and re-crystallised incorrectly. Almost always caused by incorrect temperatures. Remelt and start again.

Seized Chocolate

A single drop of water will cause melted chocolate to seize into a stiff, grainy paste. All equipment must be completely dry. If it seizes, whisk in boiling water a teaspoon at a time to make a ganache — the chocolate cannot be recovered for tempering.

Out of Temper Mid-Use

If your chocolate thickens too much while working, it has dropped below the working temperature. Warm it very briefly over a bain-marie to 31–32°C (dark) and stir — this can bring it back without starting over.

The Kit You Need

Non-Negotiable

Digital probe thermometer
Marble or granite slab (tabling)
Bench scraper and palette knife
Heatproof bowl
Couverture chocolate (not baking chips)

Recommended

Chocolate moulds (polycarbonate)
Dipping forks
Acetate sheets
A cool, dry room (18–20°C ideal)
Infrared thermometer gun

The Right Chocolate

Use couverture — chocolate with a higher cocoa butter content (31–38%) than regular chocolate. Valrhona, Callebaut, and Cacao Barry are the professional standards. Callets (pre-portioned drops) are easiest to work with.

What to Make Once You’re in Temper

Chocolate Bonbons

Pour into polycarbonate moulds, tap out the excess to form a shell, fill with ganache or praline, and seal with a second layer. Unmould once set — they should release cleanly with a mirror finish.

Chocolate Decorations

Spread thinly on acetate, allow to semi-set, then cut or shape into shards, curls, or feathered designs. Essential for plating Michelin-level desserts.

Enrobing Truffles

Roll ganache centres in tempered chocolate using dipping forks. Tap gently to remove the excess. Allow to set on parchment. The snap when you bite through will be flawless.

Chocolate Spheres

Brush tempered chocolate into hemisphere moulds, allow to set, and join the halves with a warm palette knife. Used in Michelin kitchens worldwide — and now yours.

Posted on 1 Comment

How to Make Crème Brûlée — The Perfect Crack Every Time

★ French Classic ★

How to Make Crème Brûlée

The Perfect Crack  ·  Every Time

Silky vanilla custard beneath a flawless caramelised sugar crust that shatters at the tap of a spoon. This is the exact recipe, temperature, and torch technique used in French restaurants — perfected for your home kitchen.

⏱ Prep: 15 mins  ·  Bake: 35 mins  ·  Chill: 4 hrs  ·  ⭐ Difficulty: Easy–Intermediate

What Makes a Perfect Crème Brûlée

Crème brûlée is one of the most iconic French desserts for a reason — it is the perfect marriage of contrasting textures. The custard must be set but trembling, cold at its core, and intensely vanilla. The sugar crust must be paper-thin, perfectly amber, and crack cleanly without any bitterness from over-caramelisation.

Most failures come down to three things: wrong cream-to-yolk ratio, incorrect oven temperature, or poor torch technique. This recipe eliminates all three variables with precise measurements and method.

What You Will Need

✔️ 6 egg yolks (large, room temperature)
✔️ 600ml double cream (heavy cream)
✔️ 80g caster sugar + extra for the crust
✔️ 1 vanilla pod (or 2 tsp high-quality vanilla extract)
✔️ Pinch of fine sea salt

Equipment: 4–6 ramekins, roasting tin, kitchen torch, digital thermometer


The Method

01 — Infuse

Split the vanilla pod and scrape the seeds into the cream. Add the pod. Heat gently to just below simmering (82°C) — do not boil. Remove from heat and infuse for 15 minutes. Remove the pod.

02 — Whisk

Whisk egg yolks and sugar together until pale and slightly thickened — about 2 minutes. Do not over-whisk; you want as few air bubbles as possible for a smooth custard.

03 — Temper

Pour the warm cream slowly into the yolk mixture, stirring constantly. Never the reverse. Strain through a fine sieve to remove any cooked egg and vanilla pod remnants. Skim the foam.

04 — Bake

Pour into ramekins set in a roasting tin. Fill the tin with hot water to halfway up the ramekins. Bake at 150°C (fan 130°C) for 30–35 minutes until set with a gentle wobble at the centre.

05 — Chill

Remove from the water bath. Cool to room temperature, then refrigerate for a minimum of 4 hours or overnight. The custard must be completely cold before torching.

06 — Torch

Sprinkle a thin, even layer of caster sugar (1–1.5 tsp) over each custard. Torch in slow, circular motions from 5cm above until deep amber. Allow to set for 60 seconds before serving.

The Temperature Guide

Cream Infusion

82°C

Just below simmer. Never boil.

Oven Temperature

150°C

Fan 130°C. Low and slow.

Set Custard Core

77°C

Internal temp when done.

Sugar Caramelisation

160°C

Amber, not dark brown.


Torch Technique — The Secrets

Sugar Layer Thickness

One thin, even layer is all you need — approximately 1 to 1.5 teaspoons per ramekin. Too thick and the sugar stays pale in the centre while the edges burn. Tilt the ramekin to distribute evenly before torching.

Torch Distance & Motion

Hold the torch 5cm from the surface. Move in slow, overlapping circular motions — never hold it still. The goal is even caramelisation across the entire surface. Watch for the colour: pale gold to deep amber is the window. The moment you see any smoke, move away.

Double Layer Trick

For an extra-thick, ultra-crisp crust: torch the first layer, let it cool for 30 seconds, add a second thin layer of sugar, and torch again. This is the professional technique for a crust that holds its snap even after a few minutes on the table.

Troubleshooting

Custard won’t set

Oven too hot, water bath too shallow, or ramekins too deep. Reduce oven by 10°C and extend baking time. The wobble test: jiggle the ramekin — only the very centre should move.

Grainy or curdled texture

Cream was too hot when added to yolks, or oven was too high. Always temper slowly and always bake in a water bath. Strain the mixture before pouring.

Sugar won’t caramelise evenly

Layer too thick, custard not cold enough, or torch too far away. Ensure the custard is fridge-cold, sugar layer is thin, and torch is at 5cm maximum distance.

Crust goes soggy

Serve immediately after torching. The crust will begin to absorb moisture from the custard within 10–15 minutes. Torch at the table for maximum drama and perfect crack.

★ Continue the Series ★

More Michelin Star Recipes

Posted on

The Art of Michelin Star Desserts — The Complete Guide

✦ All Cookings ✦

The Art of Michelin Star Desserts

The Complete Guide

Professional techniques. Restaurant-quality results. Every secret the pastry chefs don’t tell you — explained clearly, so you can execute them in your own kitchen.

What is a Michelin Star Dessert?

A Michelin star dessert is not simply a very good dessert. It is a composed, multi-element plate in which every component — texture, temperature, flavour, colour, and structure — has been considered and calibrated to work in concert. When you eat one, you are not just tasting ingredients. You are experiencing a piece of culinary architecture.

The Michelin Guide has awarded stars to restaurants since 1926. A one-star restaurant is defined as “a very good restaurant.” Two stars: “excellent cooking, worth a detour.” Three stars: “exceptional cuisine, worth a special journey.” The dessert course in a starred kitchen must meet the same standard as every other course — and in many of the world’s greatest restaurants, it is the dessert that the diner remembers longest.

What separates these desserts from everything else is not magic or impossible technique. It is knowledge, precision, and intent. And all three are learnable.


The 5 Principles Behind Every Michelin Star Dessert

01 — Texture Contrast

Every great plated dessert has at least three distinct textures — typically something crisp, something creamy, and something aerated or liquid. The interplay between them is what makes each bite dynamic and engaging.

02 — Temperature Contrast

Hot and cold on the same plate is one of the most powerful tools in the pastry kitchen. A warm fondant beside a cold ice cream quenelle. A room-temperature ganache against a frozen aero. Temperature contrast creates drama and surprise.

03 — Flavour Coherence

Every element must earn its place through flavour. A garnish that adds nothing but colour is a missed opportunity. In a Michelin kitchen, even the micro herb is chosen for taste, not decoration. Ask of every element: does this make the plate taste better?

04 — Visual Composition

A Michelin plate is plated off-centre, with deliberate negative space. Elements are placed with tweezers and spoons, not poured or dumped. The plate is a canvas. Three well-placed elements always beat six carelessly scattered ones.

05 — Conceptual Narrative

The best Michelin desserts have a story. Île Flottante is about lightness and French classicism. The Popcorn Cinema Homage is about nostalgia. Fluido is about the moment of revelation. Your dessert should be able to be explained in one sentence — and that sentence should create anticipation before the first bite.

Essential Techniques You Need to Master

Before attempting a composed Michelin dessert, there are a handful of foundational techniques that appear again and again across the entire repertoire. Master these and most professional recipes become accessible.

Crème Anglaise

The mother sauce of the pastry kitchen. Master this and you can make ice cream, mousse, bavarois, crème brûlée, and île flottante. Cook to exactly 82°C, never more. Use a digital thermometer.

Tempered Ganache

The foundation of every chocolate-based Michelin dessert. The ratio of cream to chocolate and the temperature at which you combine them determines whether you get a pourable sauce, a spreadable ganache, or a sliceable délice.

Italian Meringue

Hot sugar syrup poured into whipping egg whites creates a stable, glossy, safe meringue that holds for hours. Used in île flottante, lemon tart, macarons and dozens of other classical preparations. Target 121°C for the syrup.

Spherification

Sodium alginate + calcium chloride = liquid-filled pearls that burst on the tongue. Used in the Earl Grey & Yuzu Texture Study. Once understood, this technique opens up endless flavour possibilities.

Aero / Siphon Technique

An iSi cream whipper charged with N₂O cartridges transforms any liquid into a foam, espuma, or aerated solid. Used in the Popcorn Cinema Homage, Liquorice & Carrot, and Dulcey & Hazelnut Architecture.

Quenelle

The three-spoon technique for creating a smooth, pointed oval of ice cream, mousse or sorbet. It is the single most visible marker of professional plating. Practice with mashed potato before attempting with ice cream.

The Professional Pastry Toolkit

You do not need a professional kitchen. But you do need the right tools. These are the items that appear in every Michelin dessert recipe on this site — invest in them once and use them for years.

Non-Negotiable

Digital thermometer
iSi cream siphon (0.5L)
N₂O cartridges
Silicone hemisphere moulds
Fine mesh sieve
Plating tweezers

Strongly Recommended

Ice cream machine
Stand mixer
Piping bags + nozzle set
Kitchen blowtorch
Digital scale (0.1g precision)
Offset spatula

For Advanced Techniques

Sodium alginate
Calcium chloride
N-Zorbit M (tapioca maltodextrin)
Agar-agar powder
Edible gold leaf sheets
Dariole moulds

★ The Collection

All Michelin Star Series Recipes

Every recipe in the series — from foundational French classics to technically ambitious composed plates.

Fluido Egg Yolk Fondant

★ Expert · 3 hours

A warm golden fondant with a flowing egg yolk and white chocolate core. The most dramatic reveal in the collection.

Read Recipe →

Popcorn Cinema Homage

★ Expert · 4 hours

Every flavour and texture of the cinema experience, rebuilt through Michelin fine dining technique.

Read Recipe →

Dulcey & Hazelnut Architecture

★ Expert · 4 hours

One ingredient — the hazelnut — explored across five textures simultaneously on a single plate.

Read Recipe →

Earl Grey & Yuzu Texture Study

★ Advanced · 3 hours

Ganache, jelly, dacquoise and spherification pearls — molecular gastronomy in service of pure flavour.

Read Recipe →

Liquorice and Carrot

★ Advanced · 2 hours

The great underexplored pairing of earthy liquorice and sweet carrot — a plate of extraordinary elegance.

Read Recipe →

Ile Flottante

★ Advanced · 45 mins

The crown jewel of French classical patisserie — billowing meringue on silky crème anglaise with spun caramel.

Read Recipe →

Valrhona Chocolate Delice

★ Advanced · 45 mins + chill

The silkiest Valrhona chocolate ganache tart in fine dining — finished with edible gold leaf and raspberry coulis.

Read Recipe →

Crème Brûlée

★ Intermediate · 1 hour

Silky vanilla custard with a flawless caramelised sugar crust — the exact temperatures and torch technique used in French restaurants.

Read Recipe →

How to Plate Like a Michelin Chef

Plating is not decoration. It is the final act of cooking — and it communicates everything about your intention and skill before the first bite is taken.

Rule 1 — Warm the Plate

Every hot component goes on a warm plate — 40°C in an oven for 5 minutes. A cold plate drops the temperature of your dessert immediately and kills the eating experience.

Rule 2 — Off-Centre

Never place the main element in the dead centre of the plate. Place it at roughly 7–8 o’clock on a round plate. This creates visual movement and negative space.

Rule 3 — Three Elements Maximum

On a small plate, three well-placed elements are always more powerful than six scattered ones. Restraint is sophistication. If you have more components, group them intentionally.

Rule 4 — The Sauce Swoosh

The classic Michelin sauce placement is a bold arc — a large spoon placed at one point, then pulled across the plate in a sweeping motion. It should be confident, not tentative. Practice on a cold plate first.

Rule 5 — Use Tweezers

Plating tweezers are not optional. Gold leaf cannot be placed by hand. Micro herbs cannot be positioned by hand. Pearls cannot be arranged by hand. Buy a pair of 20cm stainless tweezers and use them for every garnish.

Rule 6 — Clean the Rim

Before the plate leaves the pass, wipe the rim with a clean, damp cloth. Any sauce drop or smear on the rim signals carelessness. In a Michelin kitchen this is never skipped — and it should never be skipped at home.

★ All Cookings Shop

Take Your Skills Further

Download the complete professional recipe guides — full ingredient quantities, exact temperatures, step-by-step methods and plating diagrams for every dessert in the Michelin Star Series.

Browse the Shop →

Posted on 2 Comments

Fluido Recipe — Molten Egg Yolk Fondant with Tom Kha Ice Cream (Michelin Star Dessert)

★ Michelin Star Series ★

Fluido — The Egg Yolk Fondant

Warm Golden Fondant  ·  Egg Yolk & White Chocolate Sauce  ·  Tom Kha Ice Cream

A warm, golden fondant that conceals a flowing core of egg yolk and white chocolate sauce — served alongside a fragrant Tom Kha ice cream that bridges the savoury and the sweet.

⏱ Prep: 3 hours  ·  ⏲ Freeze: 2 hours  ·  🥚 Serves: 6  ·  ⭐ Difficulty: Expert

The Concept

Fluido means fluid in Italian — and this dessert is built around that single idea. It is a fondant in the classical mould, but where the traditional fondant releases molten chocolate, this one releases something more unexpected and more beautiful: a flowing core of egg yolk enriched with white chocolate, warm and golden, that pours from the cut like liquid sunlight.

Served alongside it is a Tom Kha ice cream — inspired by the Thai soup of lemongrass, galangal, kaffir lime and coconut milk — that acts as a bridge between the savoury richness of the egg yolk and the sweet delicacy of the white chocolate. It is one of the most original flavour pairings in modern fine dining.

When the fondant is cut at the table, the golden sauce flows. Every diner leans in. That moment is the dish.

Ingredients

01 — The Fondant

150g white chocolate
100g unsalted butter
3 whole eggs
3 egg yolks
80g caster sugar
60g plain flour
1 tsp vanilla bean paste
Pinch of fine salt

02 — Egg Yolk Sauce Core

6 egg yolks (very fresh, pasteurised)
80g white chocolate, melted
30ml double cream
Pinch of Maldon sea salt
1 tsp white truffle oil (optional)
(Must be frozen into spheres before baking)

03 — Tom Kha Ice Cream

400ml full-fat coconut milk
200ml double cream
2 stalks lemongrass, bruised
4 slices fresh galangal
4 kaffir lime leaves
1 red chilli (deseeded)
6 egg yolks
120g caster sugar
Juice of 1 lime

04 — Garnish

Edible gold leaf
Micro cress or kaffir lime zest
Flaky Maldon sea salt
White chocolate shavings
Kaffir lime oil (optional)

The Method

Step 01 — Tom Kha Ice Cream (night before)

Combine coconut milk, cream, lemongrass, galangal, kaffir lime leaves and chilli in a saucepan. Bring to a gentle simmer, infuse for 25 minutes. Strain through a fine sieve. Make a crème anglaise with the infused base, yolks and sugar (cook to 82°C). Finish with lime juice. Cool over ice, churn, freeze overnight. The result is aromatic, tropical, gently spiced — sweet but with savoury undertones that mirror the egg yolk.

Step 02 — Frozen Egg Yolk Sauce Cores (4+ hours ahead)

Whisk melted white chocolate with warm cream until smooth. Cool slightly. Whisk in egg yolks one by one until silky and emulsified. Season with salt and truffle oil if using. Carefully pour into small hemisphere silicone moulds (4cm diameter) — fill to the brim. Freeze completely solid (minimum 4 hours). These frozen cores will be inserted into the fondant batter just before baking, melting as the fondant cooks.

Step 03 — Fondant Batter

Melt white chocolate and butter together over a bain-marie to 45°C. Whisk eggs, yolks and sugar until pale and slightly thickened. Pour the chocolate over the egg mixture and stir to combine. Fold in the flour and salt. Rest in the fridge for 30 minutes minimum. Heavily butter and flour six individual dariole moulds or ramekins. Fill two-thirds with batter, press one frozen egg yolk core into the centre of each (it will sink slightly), then cover with remaining batter. Refrigerate until ready to bake.

Step 04 — Baking (The Critical Moment)

Preheat oven to 200°C. Bake the fondants for exactly 9–10 minutes. The edges should be fully set with a slight jiggle remaining at the very centre. Remove from the oven and rest for 60 seconds — no more. Run a knife around the edge and invert onto a warm plate immediately. The golden fondant will hold its shape for 30–40 seconds before needing to be cut. Serve at table and cut immediately.

Step 05 — Plating (The Reveal)

Place the inverted fondant slightly left of centre on a warm plate. Quenelle the Tom Kha ice cream and set to the right, touching the fondant lightly. Place a single gold leaf fragment on top of the fondant. Scatter 3 crystals of Maldon salt on the ice cream. Add a few white chocolate shavings and a single micro cress leaf. The fondant is cut tableside — the golden egg yolk and white chocolate sauce floods the plate. The aroma of vanilla, egg and white chocolate fills the air.

Chef’s Secrets

The Frozen Core

The frozen insert must be completely solid before baking. If partially thawed, the sauce will leak into the batter during cooking rather than staying liquid until cut.

Test Bake First

Every oven is different. Always bake one test fondant ahead of service. Adjust timing by 30-second increments until the exterior is set and the centre has a liquid core when cut.

Tom Kha Balance

The ice cream should be aromatic and slightly savoury. If too sweet, add more lime juice. If too hot, reduce the chilli. It should intrigue, not overwhelm.

Egg Freshness

Use the freshest eggs available. The yolk sauce core is only partially heated during baking. In a restaurant, pasteurised yolks are used for food safety. At home, source the best quality eggs possible.

⭐ Michelin Star Series

Explore the Full Collection

Visit the Shop →
Posted on 1 Comment

Popcorn Cinema Homage — Michelin Star Plated Dessert with Popcorn Ice Cream & Cherry Coke Curd

★ Michelin Star Series ★

The Popcorn Cinema Homage

Popcorn Ice Cream  ·  Chocolate Sponge  ·  Cherry Coke Curd  ·  Peppermint Chocolate Rocks  ·  Salted Caramel Powder

An elevated love letter to cinema nostalgia — every flavour and texture of the movie theatre experience, reimagined through the lens of Michelin fine dining.

⏱ Prep: 4 hours  ·  ⏲ Freeze: overnight  ·  🍿 Serves: 6  ·  ⭐ Difficulty: Expert

The Concept

Nostalgia is one of the most powerful flavour triggers in the human experience. The Popcorn Cinema Homage takes every sensory memory of the cinema — the hot butter and salt of popcorn, the carbonated sweetness of cola, the cool sting of peppermint, the crunch of chocolate — and rebuilds each one using professional pastry techniques that elevate the familiar into the extraordinary.

The salted caramel powder, made using N-Zorbit M (a tapioca-based fat absorber), is the showpiece — dry and free-flowing at room temperature, it dissolves on the tongue into pure, liquid caramel. The peppermint chocolate rocks shatter. The Cherry Coke curd fizzes on the palate. This is sensory theatre.

It is childlike and sophisticated in equal measure. That is the point.

Ingredients

01 — Popcorn Ice Cream

500ml whole milk
200ml double cream
80g fresh popcorn (salted butter)
6 egg yolks
140g caster sugar
1 tsp vanilla extract

02 — Chocolate Sponge

3 eggs
90g caster sugar
60g plain flour
30g dark cocoa powder
30g unsalted butter, melted
Pinch of salt

03 — Cherry Coke Curd

200ml Coca-Cola (reduced to 80ml)
100ml Morello cherry juice
3 egg yolks
60g caster sugar
80g unsalted butter, cold & cubed
1 tsp citric acid

04 — Peppermint Chocolate Rocks

200g dark chocolate (70%)
1 tsp peppermint oil (food grade)
iSi siphon + 2 N₂O cartridges
2 gelatine leaves
100ml double cream

05 — Salted Caramel Powder

150g caster sugar
50ml double cream
30g unsalted butter
1 tsp Maldon sea salt
60g N-Zorbit M (tapioca maltodextrin)

The Method

Step 01 — Popcorn Ice Cream (night before)

Heat milk and cream to a simmer. Add warm popcorn and infuse off the heat for 25 minutes. Strain, pressing hard to extract all the buttery, savoury flavour. Discard the popcorn. Make a crème anglaise base with yolks and sugar (cook to 82°C). Combine with infused milk, cool over ice, churn, and freeze overnight.

Step 02 — Chocolate Sponge

Preheat oven to 180°C. Whisk eggs and sugar over a bain-marie until warm, then whip on a stand mixer to ribbon stage (6–8 minutes). Sift flour, cocoa and salt, fold in gently. Add melted butter last, fold until just incorporated. Spread thinly on a lined baking tray. Bake 8–10 minutes until just set. Cool. Cut into rectangles using a 6x3cm cutter.

Step 03 — Cherry Coke Curd

Reduce Coca-Cola in a saucepan to a syrup of 80ml — this concentrates the cola flavour dramatically. Whisk with cherry juice, yolks, and sugar in a bain-marie until thickened (83°C). Off heat, whisk in cold butter piece by piece until emulsified. Stir in citric acid. Pass through a fine sieve, cool with cling film pressed on the surface. Pipe into small rounds using a piping bag.

Step 04 — Peppermint Chocolate Rocks (Aero Method)

Melt chocolate with cream and bloomed gelatine. Cool to 35°C. Add peppermint oil — start with 3 drops and taste. Pour into an iSi siphon, charge twice, dispense into a container and freeze immediately. Once solid, break into irregular shards. Keep frozen until plating.

Step 05 — Salted Caramel Powder (N-Zorbit M)

Make a dry caramel to amber. Deglaze carefully with cream, stir in butter and salt. Cool to room temperature. Place N-Zorbit M in a food processor. With the motor running, slowly pour the caramel in a thin stream. The fat absorber converts the liquid into a dry, scoopable powder. Store in an airtight container.

Step 06 — Plating (The Cinema Experience)

Place the chocolate sponge rectangle as the base. Pipe three rounds of Cherry Coke curd alongside it. Arrange three peppermint chocolate rocks in a cluster. Quenelle the popcorn ice cream and set it on the sponge. Drift the salted caramel powder over the plate in a sweeping arc. Finish with two pieces of real popcorn placed on top of the ice cream quenelle.

Understanding N-Zorbit M

What It Is

N-Zorbit M is tapioca maltodextrin — a fat-absorbing starch that converts fat-based liquids into dry powders without losing flavour.

The Ratio

Start with a 60:40 ratio of N-Zorbit to liquid fat. Adjust by adding more N-Zorbit if the mixture stays sticky, or more liquid if too dry.

On The Tongue

The powder dissolves the moment it makes contact with saliva, flooding the palate with the original liquid flavour. It is one of the most dramatic textural effects in molecular gastronomy.

Other Uses

Foie gras powder, olive oil powder, peanut butter powder — any fat-based liquid can be transformed. It is one of the most versatile tools in the modern pastry kitchen.

⭐ Michelin Star Series

Explore the Full Collection

All Recipes →
Posted on 1 Comment

Dulcey & Hazelnut Dessert Recipe — Michelin Star Multi-Texture Plated Dessert

★ Michelin Star Series ★

Dulcey & Hazelnut Architecture

Dulcey Mousse  ·  Hazelnut Crémeux  ·  Dulcey Aero  ·  Hazelnut Tuile  ·  Hazelnut Ice Cream

A multi-textured masterpiece that takes a single, extraordinary ingredient — the hazelnut — and explores every state it can achieve: creamy, aerated, frozen, crisp, and molten.

⏱ Prep: 4 hours  ·  ⏲ Freeze: overnight  ·  🌰 Serves: 6  ·  ⭐ Difficulty: Expert

The Philosophy

The greatest Michelin desserts are not collections of ingredients — they are arguments about a single idea. Dulcey & Hazelnut Architecture is an argument about one thing: the hazelnut, and how many forms of pleasure it is capable of delivering simultaneously.

Valhona’s Dulcey chocolate — blond, caramelised, biscuity — is the perfect amplifier for hazelnut’s roasted depth. Together they appear here as a cloud-light mousse, a dense silky crémeux, an aerated chocolate called Aero, a gossamer tuile, and a pale golden ice cream. Five preparations. One ingredient. One plate.

This is architecture. Every element must be in its place, or the whole edifice collapses.

Ingredients

01 — Dulcey Mousse

200g Valhona Dulcey chocolate
3 egg yolks
60g caster sugar
100ml whole milk
350ml double cream (whipped to soft peaks)
2 gelatine leaves

02 — Hazelnut Crémeux

150g toasted hazelnut paste
4 egg yolks
80g caster sugar
250ml whole milk
250ml double cream
3 gelatine leaves

03 — Dulcey Aero

300g Dulcey chocolate, tempered
N₂O cream whipper (iSi siphon)
2 gelatine leaves
100ml double cream
(Requires a vacuum chamber or siphon technique)

04 — Hazelnut Tuile

100g isomalt or fondant
50g glucose syrup
80g toasted hazelnuts, finely crushed
Pinch of flaky salt

05 — Hazelnut Ice Cream

500ml whole milk
200ml double cream
6 egg yolks
140g caster sugar
120g roasted hazelnut paste
Pinch of sea salt

The Method

Step 01 — Hazelnut Ice Cream (night before)

Warm milk and cream together. Whisk yolks and sugar until pale. Temper the hot cream into the yolks. Cook to 82°C, stirring constantly. Off heat, whisk in hazelnut paste and salt until fully emulsified. Strain through a fine sieve, cool over ice, then churn. Freeze overnight. Temper 5 minutes before service and quenelle to order.

Step 02 — Hazelnut Crémeux

Make a crème anglaise with milk, cream, yolks and sugar (cook to 82°C). Off heat, whisk in hazelnut paste and bloomed gelatine. Cool to 40°C, pour into a piping bag and pipe into 4cm dome moulds. Freeze until solid. Unmould and allow to defrost in the fridge for 2 hours before plating.

Step 03 — Dulcey Mousse

Make a pâte à bombe: whisk yolks while pouring hot sugar syrup (120°C) in a thin stream. Continue until cool and ribbon stage. Melt Dulcey chocolate to 45°C. Bloom and melt gelatine in warm milk, stir into chocolate. Fold pâte à bombe into chocolate, then fold in softly whipped cream in two additions. Pour into rectangular moulds and freeze 4 hours minimum.

Step 04 — Dulcey Aero (Siphon Method)

Melt Dulcey with cream and bloomed gelatine. Cool to 35°C. Pour into an iSi siphon, charge with 2 N₂O cartridges. Dispense into a container lined with cling film to 2cm depth and freeze immediately. Once solid, cut into irregular shards. Keep frozen until plating.

Step 05 — Hazelnut Tuile

Heat isomalt and glucose to 160°C. Stir in crushed hazelnuts and salt off the heat. Pour onto a silicone mat and allow to cool to a manageable temperature. Pull and stretch into thin sheets while still pliable. Break into shards when cool. Store in an airtight container with silica gel to prevent softening.

Step 06 — Plating (The Architecture)

Build the plate from the base: place the Dulcey mousse rectangle slightly left of centre. Set the hazelnut crémeux dome at 2 o’clock. Lean a large Aero shard against the mousse at an angle. Place the hazelnut tuile shard vertically in the crémeux. Quenelle the ice cream and rest against the opposite side. Finish with three roasted whole hazelnuts, a dusting of hazelnut powder through a fine sieve, and micro gold leaf fragments.

Chef’s Secrets

Dulcey Temperature

Dulcey chocolate is more heat-sensitive than dark. Never exceed 45°C when melting. Use a bain-marie and thermometer at all times.

Hazelnut Paste

Use 100% pure roasted hazelnut paste, not praline paste. The difference in flavour intensity is enormous. Piedmont hazelnuts are the professional standard.

The Aero

Work fast once the siphon is discharged. The aerated chocolate sets within minutes. Have your freezer tray ready before you dispense.

The Tuile

Humidity is the enemy of tuile. Always store with silica gel and make on the day of service. Isomalt stays crisp longer than regular sugar.

⭐ Michelin Star Series

Explore the Full Collection

All Recipes →
Posted on 1 Comment

Earl Grey & Yuzu Dessert Recipe — Michelin Star Plated Dessert with Spherification

★ Michelin Star Series ★

Earl Grey & Yuzu Texture Study

Earl Grey Ganache  ·  Yuzu Jelly  ·  Coconut Dacquoise  ·  Yuzu Pearls

A refined exploration of floral and citrus notes through contrast of temperature, texture and technique — anchored by the drama of yuzu pearls made via spherification.

⏱ Prep: 3 hours  ·  ⏲ Chill: overnight  ·  🌊 Serves: 6  ·  ⭐ Difficulty: Advanced

The Concept

The “Texture Study” is a Michelin format in which a single flavour pairing is explored across multiple preparations and textures simultaneously on one plate. Here, floral Earl Grey and sharp, perfumed yuzu are the subjects — each pushed through several different states of matter to create a dessert that is as intellectually engaging as it is delicious.

The ganache is silky, dark and bergamot-heavy. The yuzu jelly is clean and electric. The coconut dacquoise provides a nutty, airy anchor. And then the yuzu pearls arrive — trembling spheres of pure citrus juice, made via sodium alginate spherification, that burst on the tongue like the finest caviar from the sea.

This is molecular gastronomy in service of flavour, not spectacle.

Ingredients

01 — Earl Grey Ganache

250ml double cream
3 tbsp loose Earl Grey tea
200g dark chocolate (64%)
30g unsalted butter
Pinch of sea salt

02 — Yuzu Jelly

150ml yuzu juice
50ml water
40g caster sugar
3g agar-agar powder
Zest of 1 unwaxed lemon

03 — Coconut Dacquoise

120g egg whites (4 large)
110g caster sugar
80g desiccated coconut, toasted
40g ground almonds
20g icing sugar
Pinch of cream of tartar

04 — Yuzu Pearls (Spherification)

250ml yuzu juice
2.5g sodium alginate
1 litre cold water
5g calcium chloride
Sugar to taste

The Method

Step 01 — Earl Grey Ganache (day before)

Heat the cream to a gentle simmer. Remove from heat, add the Earl Grey leaves and steep for 8 minutes. Strain through a fine sieve, pressing to extract all flavour. Return to the heat and bring back to a simmer. Pour in three additions over the chopped chocolate, stirring from the centre outward each time until silky. Stir in butter and salt. Pour into a tray lined with cling film to a depth of 1.5cm. Refrigerate overnight.

Step 02 — Yuzu Jelly

Combine yuzu juice, water and sugar in a saucepan. Whisk in agar-agar. Bring to the boil for 2 minutes, whisking constantly. Add lemon zest. Pour onto a tray to 5mm depth. Allow to set at room temperature then refrigerate. Once set, cut into precise 3cm cubes with a hot knife.

Step 03 — Coconut Dacquoise

Preheat oven to 160°C. Fold together toasted coconut, ground almonds and icing sugar. Whip egg whites with cream of tartar to soft peaks, gradually add caster sugar and whip to stiff, glossy peaks. Fold nut mixture into meringue in two additions. Pipe or spread into 7cm rounds on a lined tray. Bake 18–22 minutes until lightly golden and set. Cool completely.

Step 04 — Yuzu Pearls via Spherification

Using an immersion blender, blend sodium alginate into yuzu juice. Rest for 30 minutes to remove air bubbles. Separately, dissolve calcium chloride in 1 litre cold water. Using a small round measuring spoon or a syringe, drop the yuzu mixture droplet by droplet into the calcium chloride bath. The outer membrane forms within 60–90 seconds. Remove pearls with a slotted spoon and rinse gently in clean water. Use within 2 hours.

Step 05 — Plating (Michelin Standard)

Using a warm knife, cut the ganache into a 5x3cm rectangle and place centrally. Set the dacquoise disc alongside it slightly overlapping. Place three yuzu jelly cubes in a descending diagonal line. Spoon 8–10 yuzu pearls over and around the ganache using a small spoon. Finish with a single piece of edible gold leaf on the ganache and a tiny spray of bergamot oil tableside.

Chef’s Notes on Spherification

The Science

Sodium alginate binds with calcium ions to form a gel skin. The reaction stops when the pearl is removed and rinsed — so timing is critical for a thin, burst-able membrane.

pH Warning

Yuzu juice is acidic. If spherification fails, add a small amount of sodium citrate to raise the pH before blending in sodium alginate.

Size Control

A 5ml measuring spoon produces caviar-sized pearls. A 15ml spoon gives olive-sized spheres. Consistency of drop height above the bath determines uniformity.

Service Window

Pearls continue to gel over time. Make within 2 hours of service and store in fresh yuzu juice to preserve flavour and halt over-gelling.

⭐ Michelin Star Series

Explore the Full Collection

All Recipes →
Posted on

Liquorice & Carrot — Michelin Star Plated Dessert Recipe

★ Michelin Star Series ★

Liquorice & Carrot

Pastry Cream Espuma  ·  Carrot Cake  ·  Liquorice Ice Cream  ·  Carrot Sauce

An unexpected pairing of earthy liquorice and sweet carrot — a plated dessert of extraordinary depth and elegance that challenges everything you think you know about both ingredients.

⏱ Prep: 2 hours  ·  ⏲ Freeze: overnight  ·  🍲 Serves: 6  ·  ⭐ Difficulty: Advanced

Liquorice and Carrot Michelin Dessert Plate

The Story of This Plate

Liquorice and carrot is one of the great underexplored pairings in modern patisserie. Both carry an anise-adjacent earthiness, both have a natural sweetness that intensifies with heat, and together they create a dialogue on the plate that is simultaneously grounded and surprising.

The base is a tender, spiced carrot cake — moist, deep, and fragrant. Alongside it sits a quenelle of intensely flavoured liquorice ice cream, its cold creaminess cutting through the warmth of the plate. A swoosh of vibrant carrot sauce brings acidity and colour. The liquorice pastry cream espuma — aerated to a cloud-like lightness — is spooned tableside. And a single baton of glazed carrot provides the garnish: elegant, simple, precise.

This is fine dining at its most considered. Every element earns its place.


Ingredients

01 — Carrot Cake

200g plain flour
1½ tsp baking powder
½ tsp bicarbonate of soda
1½ tsp ground cinnamon
½ tsp ground ginger
¼ tsp ground nutmeg
Pinch of fine sea salt

180g light brown sugar
3 large eggs
180ml sunflower oil
1 tsp vanilla extract
250g finely grated carrot
60g toasted walnuts, chopped
Zest of 1 orange

02 — Liquorice Ice Cream

500ml whole milk
200ml double cream
6 egg yolks
140g caster sugar

30g pure liquorice paste
1 tsp black treacle
Pinch of sea salt
1 tsp anise extract (optional)

03 — Liquorice Pastry Cream Espuma

400ml whole milk
4 egg yolks
80g caster sugar
30g cornflour

25g liquorice paste
1 tsp vanilla extract
200ml double cream (lightly whipped)
2 gelatine leaves

Requires a cream whipper / iSi siphon with 2 N₂O charges

04 — Carrot Sauce

400ml fresh carrot juice
50g unsalted butter
1 tbsp honey
1 tsp fresh ginger, grated
Juice of ½ lemon
Pinch of salt

05 — Glazed Carrot Garnish

3 medium Chantenay carrots, peeled & halved lengthways
30g unsalted butter
1 tbsp honey
1 tbsp orange juice
Flaky sea salt & micro cress to finish

The Method

Step 01 — Liquorice Ice Cream (night before)

Warm milk and cream. Whisk in liquorice paste and treacle. Whisk yolks and sugar until pale, temper in hot cream. Cook to 82°C. Strain, cool over ice, churn and freeze overnight. Temper 5 minutes before serving.

Step 02 — Carrot Cake

Preheat oven to 170°C. Sift dry ingredients. Whisk sugar, eggs, oil and vanilla. Fold in dry mix, then carrot, walnuts and orange zest. Bake in a 20cm tin 30–35 mins. Cool, then cut into 6 neat 5cm cylinders with a ring cutter.

Step 03 — Liquorice Pastry Cream Espuma

Make a pastry cream with the milk, yolks, sugar and cornflour. Off heat, stir in liquorice paste, vanilla and soaked gelatine. Cool to 40°C, fold in whipped cream. Sieve into a cold iSi siphon, charge with 2 N₂O cartridges, refrigerate 2 hours minimum.

Step 04 — Carrot Sauce

Reduce carrot juice by half. Whisk in butter to emulsify. Add honey, ginger and lemon juice. Season and pass through a fine sieve. Keep warm.

Step 05 — Glazed Carrot Garnish

Melt butter with honey and orange juice. Add carrots cut-side down and cook 8–10 minutes until tender and lacquered. Season with flaky salt. Keep warm.

Step 06 — Plating (Michelin Standard)

Warm the plates. Place a carrot cake cylinder slightly left of centre. Sweep a bold arc of carrot sauce across the plate. Rest a quenelle of liquorice ice cream against the cake. Place one glazed carrot baton diagonally on top. Dispense espuma tableside in a generous cloud. Finish with micro cress and a flaky sea salt crystal on the ice cream.

Chef’s Secrets

Liquorice Quality

Use pure liquorice paste — not candy or syrup. Pontefract cake dissolved in warm cream, or Amarelli extract, gives the cleanest flavour.

Espuma Temperature

The siphon must be ice cold before charging. A warm siphon collapses the foam. Charge at least 2 hours ahead and dispense straight from the fridge.

Carrot Sauce Colour

Fresh-pressed carrot juice gives a luminous orange sauce. Reduce quickly over high heat to preserve its vivid colour and sweetness.

Plate Temperature

Warm plates to 40°C before service — warm to the touch but gentle enough not to melt the ice cream instantly.

Sommelier’s Note

Pairing Suggestion

A Pedro Ximénez sherry is extraordinary alongside this plate — its notes of dried fig, molasses and anise mirror the liquorice perfectly. Alternatively, a late harvest Riesling will lift the entire plate with gentle acidity.

Disclosure: This post may contain affiliate links. All Cookings earns a small commission at no extra cost to you.

Posted on 1 Comment

Île Flottante Recipe — Poached Meringue with Praline & Crème Anglaise

★ Michelin Star Series ★

Île Flottante with Praline & Crème Anglaise

Spun Caramel  ·  Toasted Almond Praline  ·  Silky Vanilla Crème Anglaise

Billowing poached meringue islands floating on a sea of silky vanilla crème anglaise — one of the most elegant and technically demanding desserts in the French classical repertoire.

⏱ Prep: 45 mins  ·  ⏲ Chill: 1 hour  ·  ☁️ Serves: 6  ·  ⭐ Difficulty: Advanced

Ile Flottante with Praline and Creme Anglaise
Île Flottante — billowing meringue islands, silky crème anglaise, spun caramel and toasted almond praline.

The Most Elegant Dessert in French Cuisine

Île flottante — floating island — is one of the crown jewels of French patisserie. Gossamer-light meringue, poached to cloud-like perfection, set adrift on a pool of the most silky vanilla crème anglaise imaginable. Finished with shards of spun caramel and a scattering of toasted almond praline, this is a dessert of theatrical elegance and extraordinary lightness.

You will find this on the menus of the finest brasseries in Paris and on the tasting menus of Michelin-starred kitchens. The technique is precise but learnable — and the result is unlike anything else in the dessert repertoire.

This is the full professional recipe — the kind served in starred kitchens — complete with exact timings, temperatures, and the plating technique used by trained pastry chefs.

What You Will Learn

✔️ How to make the perfect Italian meringue base
✔️ The exact poaching technique for cloud-like meringue islands
✔️ How to make a silky crème anglaise without scrambling the eggs
✔️ Toasted almond praline from scratch
✔️ The art of spun caramel (cage & threads)
✔️ Michelin-standard plating technique
✔️ Chef’s secrets for achieving the perfect wobble

Ingredients

The Meringue

4 large egg whites
150g caster sugar
1 tsp white wine vinegar
Pinch of fine salt

Crème Anglaise

600ml whole milk
6 large egg yolks
120g caster sugar
1 vanilla pod

Almond Praline

100g blanched almonds
150g caster sugar
50ml water
Pinch of sea salt

Spun Caramel

200g caster sugar
100ml water

Method

01 — Almond Praline

Toast the almonds in a dry pan over medium heat until golden and fragrant. In a separate saucepan, dissolve the sugar in the water and cook without stirring to a deep amber caramel (175°C). Remove from the heat, add the almonds and a pinch of sea salt, and stir to coat. Pour immediately onto a sheet of lightly oiled parchment. Leave to cool completely, then crush with a rolling pin to a coarse, irregular rubble.

02 — Crème Anglaise

Split the vanilla pod and scrape the seeds into the milk. Heat the milk over medium heat until it just reaches a simmer. Whisk the egg yolks with the caster sugar until pale and slightly thickened. Pour the hot milk onto the yolk mixture in a slow, steady stream, whisking constantly. Return to the pan over medium-low heat. Stir continuously with a wooden spoon, reaching into the corners of the pan, until the sauce thickens and coats the back of the spoon (82°C). Do not allow it to boil. Strain immediately into a cold bowl. Chill until needed.

03 — Poached Meringue Islands

Bring a wide, deep pan of water to a gentle, barely-there simmer. Whisk the egg whites with a pinch of salt to soft peaks. Add the caster sugar in a slow, steady stream, whisking continuously to a stiff, glossy meringue. Add the white wine vinegar and whisk for a further 10 seconds. Using two large spoons, shape oval quenelles of meringue and lower gently onto the simmering water. Poach for 2–3 minutes on each side. Remove carefully with a slotted spoon onto a clean kitchen towel to drain. Refrigerate until plating.

04 — Spun Caramel

Dissolve the sugar in the water in a clean, dry saucepan. Cook without stirring to a pale amber caramel (165°C). Remove from the heat and allow to cool for 1–2 minutes until it thickens slightly and begins to thread when lifted with a fork. Working quickly over two lightly oiled rolling pins (or the back of an oiled bowl), dip a fork into the caramel and wave it rapidly back and forth to create long golden threads. Gather into a nest and use immediately.

05 — Plating

Chill your serving bowls for at least 10 minutes. Pour a generous pool of cold crème anglaise into each bowl. Float a poached meringue island in the centre. Scatter almond praline around the base of the meringue and directly onto the anglaise. Crown the meringue with a small nest of spun caramel threads. Serve immediately — the caramel will soften within minutes.

Chef’s Note — The Anglaise Temperature

82°C is the sweet spot. Below it the sauce is too thin; above it the yolks begin to scramble. Use a digital thermometer and pull the pan from the heat a degree or two before it arrives — residual heat does the rest.

Chef’s Note — Meringue Water Temperature

The water must never actually boil. A rolling boil will batter the meringue and cause it to break apart. Keep it at the gentlest simmer — a few lazy bubbles rising to the surface is exactly right.

Chef’s Note — Caramel Timing

Spin the caramel at the very last moment, directly before service. Even a few minutes at room temperature will cause the threads to absorb moisture from the air and collapse. Practice the spinning motion before the caramel is ready.

⭐ Michelin Star Series

Also in the Series

Valrhona Chocolate Délice · Liquorice & Carrot Composed Plate · More coming soon

All Recipes →

Disclosure: This post may contain affiliate links. All Cookings earns a small commission at no extra cost to you.