Posted on

Chocolate Fondant Recipe with Molten Centre & Vanilla Bean Ice Cream

★ 5-Star Dessert Series ★

Dark Chocolate Fondant with Vanilla Bean Ice Cream

A perfectly set exterior giving way to a river of molten dark chocolate — the most dramatic dessert in fine dining.

⏱ Prep: 20 mins  ·  ⏲ Chill: 1 hour  ·  🍫 Serves: 6  ·  ⭐ Difficulty: Intermediate

The Most Dramatic Dessert in Fine Dining

Few desserts command the same reverence as the chocolate fondant. The moment you break through that perfectly set shell and a dark river of molten chocolate flows out onto the plate — that is one of the great moments in gastronomy. This is the recipe that gets it right every single time: intense, dark, glossy and devastatingly good alongside a quenelle of cold vanilla bean ice cream.

The secret is resting time and oven precision. Master those two things and this dessert will never fail you.


Ingredients

The Fondant

200g Valrhona 70% dark chocolate
200g unsalted butter
4 large eggs
4 egg yolks
200g caster sugar
80g plain flour, sifted
Cocoa powder for dusting

Vanilla Bean Ice Cream

500ml double cream
250ml whole milk
2 vanilla pods, split
6 egg yolks
150g caster sugar
Pinch of flaky sea salt

To Serve

Cocoa powder for dusting
Flaky sea salt
Fresh raspberries
Micro mint leaves
Edible gold leaf

The Method

Step 1 — Ice Cream First. Heat cream, milk and vanilla pods to a simmer. Whisk yolks and sugar until pale. Temper hot cream into yolks, return to pan, stir over low heat until it coats a spoon (82°C). Strain, cool over ice, churn in ice cream machine. Freeze.

Step 2. Butter 6 individual dariole moulds or ramekins generously. Dust with cocoa powder, tapping out excess. Refrigerate.

Step 3. Melt chocolate and butter together in a bowl over barely simmering water. Stir until completely smooth and glossy. Cool to 35°C.

Step 4. Whisk eggs, yolks and sugar together until thick, pale and doubled in volume — about 5 minutes. This creates the structure.

Step 5. Fold chocolate mixture into egg mixture. Sift over flour and fold gently until just combined — do not overmix.

Step 6. Divide batter evenly between prepared moulds. Refrigerate for a minimum of 1 hour, up to 24 hours. This is the key to a consistent molten centre.

Step 7. Preheat oven to 200°C. Bake fondants straight from the fridge for exactly 12 minutes. The sides will be set, the centre will wobble.

Step 8 — The Reveal. Rest 1 minute. Run a knife around the edge. Turn out onto a warm plate. Dust with cocoa. Add a quenelle of ice cream, three raspberries, a pinch of Maldon and a whisper of gold leaf.

Chef’s Secrets

01 — The Cold Rest

Chilling the batter is non-negotiable. It firms the exterior and ensures the centre stays molten during baking. Never bake from room temperature.

02 — Oven Precision

Every oven is different. Test one fondant first. 12 minutes is a guide — you may need 11 or 13. The sides must be fully set before turning out.

03 — The Chocolate

Use the best dark chocolate you can find. Valrhona 70% is the professional standard. The quality of your chocolate is the quality of your fondant.

Disclosure: This post may contain affiliate links. All Cookings earns a small commission at no extra cost to you.

Posted on

Strawberry Millefeuille Recipe with Vanilla Crème Pâtissière

★ 5-Star Dessert Series ★

Strawberry Millefeuille with Vanilla Crème Pâtissière

Shattering layers of caramelised puff pastry, cloud-soft vanilla cream and the finest summer strawberries.

⏱ Prep: 1 hour  ·  ⏲ Chill: 2 hours  ·  🍓 Serves: 6  ·  ⭐ Difficulty: Advanced

The Art of the Millefeuille

The millefeuille — meaning a thousand leaves — is one of the most celebrated desserts in French patisserie. Three precise layers of caramelised, shatteringly crisp puff pastry are sandwiched with silky vanilla crème pâtissière and crowned with perfectly ripe strawberries. Every element must be made with care. Every layer must be even. The result is nothing short of extraordinary.

This recipe is the version served in the great Parisian patisseries — precise, elegant, and utterly unforgettable.


Ingredients

Puff Pastry

500g all-butter puff pastry
80g icing sugar
Pinch of fine sea salt

Crème Pâtissière

500ml whole milk
1 vanilla pod, split
6 egg yolks
120g caster sugar
40g cornflour
50g unsalted butter
200ml double cream, whipped

Strawberries & Finish

500g fresh strawberries
2 tbsp strawberry jam, warmed
Icing sugar for dusting
Fresh mint leaves
Edible gold leaf (optional)

The Method

Step 1. Preheat oven to 200°C. Roll puff pastry to 3mm thickness. Cut into three equal rectangles approximately 10x30cm. Place on lined baking trays, prick all over with a fork and refrigerate 30 minutes.

Step 2. Dust pastry generously with icing sugar. Bake 18–22 minutes until deeply golden and caramelised. The sugar will form a glass-like crust. Cool completely on a wire rack.

Step 3. For the crème pâtissière: heat milk with vanilla pod and seeds to just below a simmer. Whisk egg yolks, sugar and cornflour together until pale. Pour hot milk over egg mixture in a slow stream, whisking constantly.

Step 4. Return to pan. Cook over medium heat, stirring constantly, until thick and bubbling — about 3 minutes. Remove from heat, beat in cold butter. Press cling film directly onto surface. Chill completely.

Step 5. Whip double cream to soft peaks. Fold gently into chilled crème pâtissière to create a light, airy diplomat cream. Transfer to a piping bag fitted with a large round nozzle.

Step 6. Hull and halve strawberries. Brush with warm jam to glaze.

Step 7. Place first pastry layer on serving board. Pipe diplomat cream in neat rows. Arrange strawberries. Repeat with second layer.

Step 8 — The Finish. Place final pastry layer on top. Dust with icing sugar. Garnish with whole strawberries, mint and gold leaf. Slice immediately with a hot serrated knife for clean cuts.

Chef’s Secrets

01 — The Caramel Crust

Dust pastry with icing sugar twice during baking for maximum caramelisation. The result is a glass-like crust that shatters beautifully on the fork.

02 — The Cream

The crème pâtissière must be completely cold before folding in the whipped cream. Warm custard will deflate the cream and ruin the texture.

03 — Assembly Timing

Assemble no more than 2 hours before serving. The pastry will soften if left too long — you want that shatter when you cut through.

Disclosure: This post may contain affiliate links. All Cookings earns a small commission at no extra cost to you.

Posted on 1 Comment

Valrhona Chocolate Délice Recipe — Michelin Star Chocolate Tart with Gold Leaf

★ Michelin Star Series ★
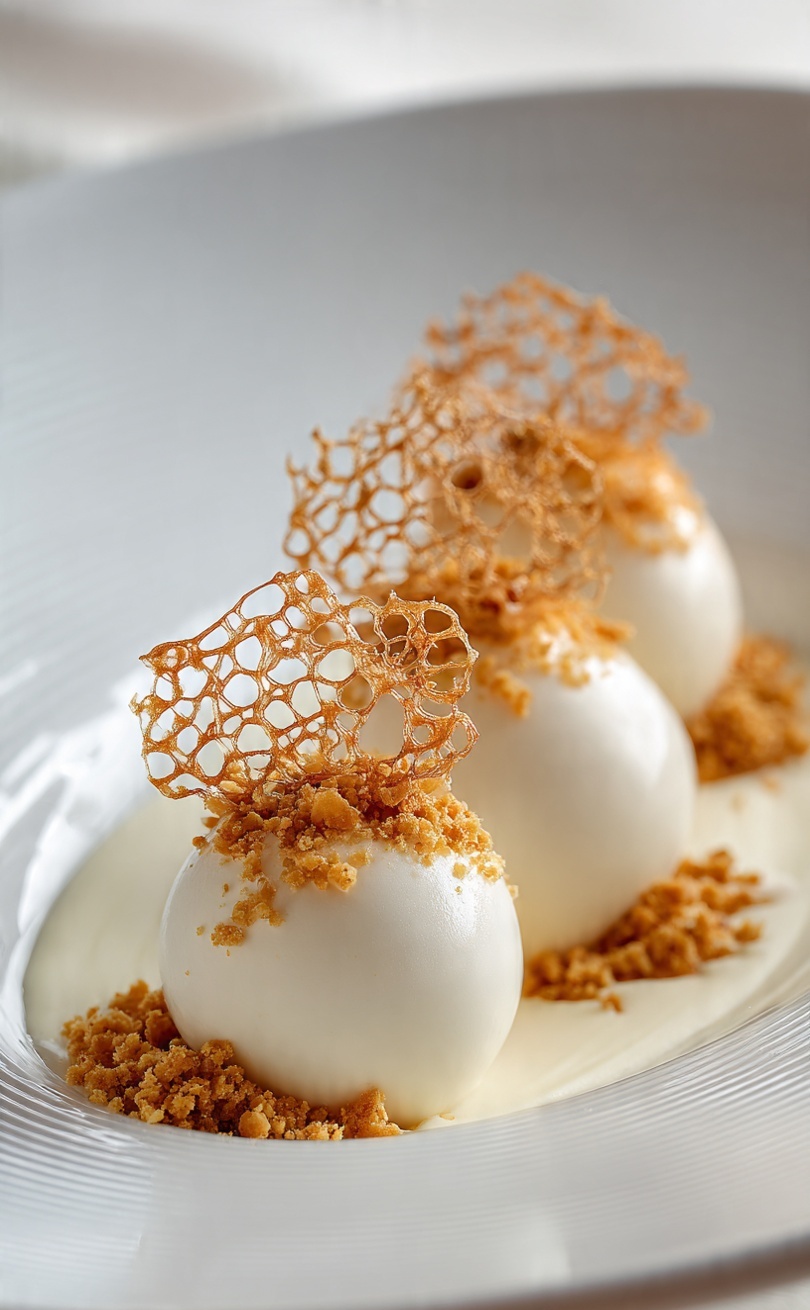
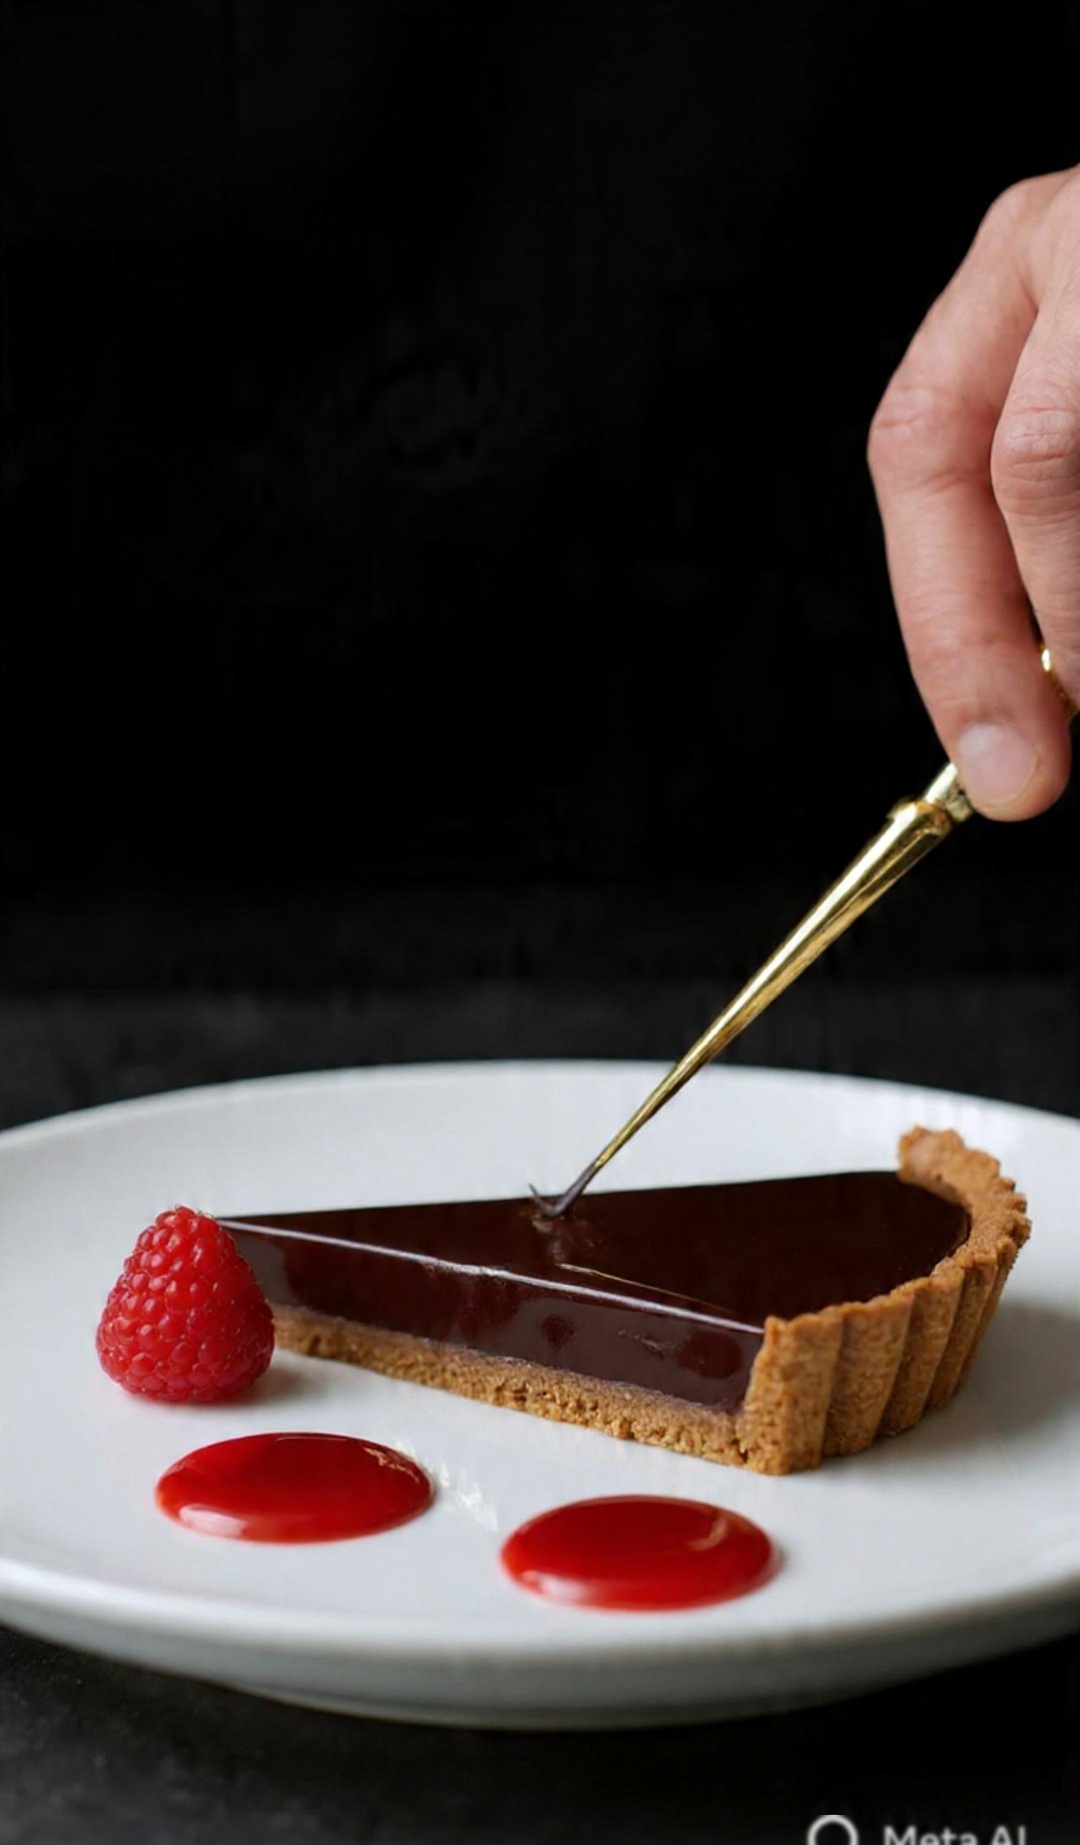
Valrhona Chocolate Délice with Raspberry Coulis & Gold Leaf

The silkiest, most intensely chocolatey dessert in fine dining — perfected for the home kitchen.

⏱ Prep: 45 mins  ·  ⏲ Chill: 4 hours  ·  🍫 Serves: 8  ·  ⭐ Difficulty: Advanced

Valrhona Chocolate Delice hero
Valrhona Chocolate Délice — the defining dessert of 1 Michelin star dining. Silky, intense, immaculate.

What is a Chocolate Délice?

A chocolate délice is the jewel of the fine dining dessert trolley. The word délice means delight in French — and this dessert earns that name in every possible way. It is a set chocolate ganache tart of extraordinary silkiness, made with the finest dark chocolate, double cream and a whisper of sea salt, poured into a buttery sweet pastry shell and chilled until it trembles.

You will find this dessert on the menus of Michelin-starred restaurants across Paris, London and New York — plated with mathematical precision, finished with edible gold leaf, and accompanied by a vivid raspberry coulis that cuts through the richness with electric acidity.

Today I am going to show you how to make it at home — with the exact technique, the exact ratios, and the exact finishing touches that separate a délice from every other chocolate dessert.

⭐ Why This Recipe

✔️ Michelin star technique
✔️ Valrhona 70% chocolate
✔️ Perfect for dinner parties
✔️ Make-ahead friendly
✔️ Restaurant plating guide
✔️ Raspberry coulis included
✔️ Gold leaf finishing touch
✔️ Gluten-free option included


Ingredients

Pâte Sucrée

200g plain flour
100g unsalted butter, cold & cubed
80g icing sugar, sifted
2 large egg yolks
1 tsp vanilla extract
Pinch of fine sea salt
2–3 tbsp ice cold water

Chocolate Délice Filling

300g Valrhona 70% dark chocolate
300ml double cream
50ml whole milk
3 large eggs, room temperature
50g unsalted butter, softened
1 tsp flaky sea salt (Maldon)
1 tsp vanilla bean paste

Raspberry Coulis & Finish

250g fresh raspberries
50g caster sugar
1 tbsp lemon juice
Edible gold leaf sheets
Fresh raspberries
Micro herbs
Flaky sea salt crystals

Valrhona Chocolate Delice slice with gold leaf
The ganache must be poured at exactly 35°C — the most critical step in the entire recipe.

The Method

Step 1. In a food processor, pulse the flour, icing sugar and salt together. Add the cold cubed butter and pulse until the mixture resembles fine breadcrumbs.

Step 2. Add the egg yolks and vanilla. Pulse until just coming together. Wrap in cling film and refrigerate for 1 hour minimum.

Step 3. Preheat oven to 180°C. Roll pastry to 3mm thickness. Line a 23cm tart tin and blind bake with baking beans for 15 minutes. Egg wash, then bake 8 more minutes until golden. Cool completely.

Step 4. Heat cream and milk to just below a simmer. Pour over chopped Valrhona chocolate in three additions, stirring from the centre outward each time.

Step 5. Cool ganache to exactly 35°C. Add whisked eggs, softened butter, vanilla paste and sea salt. Stir until completely silky and smooth.

Step 6. Reduce oven to 110°C. Pour filling into the cooled tart shell. Bake 20–25 minutes — the outer 4cm should be set but the centre must still wobble like barely-ripe jelly.

Step 7. Cool 30 minutes then refrigerate uncovered for a minimum of 4 hours. Overnight gives the best texture.

Step 8. For coulis: cook raspberries, sugar and lemon juice for 5–7 minutes. Pass through a fine sieve. Cool and refrigerate.

Step 9. Slice with a hot knife wiped clean between every cut. Place the slice off-centre on a warm white plate.

Step 10 — Michelin Plating. Create three descending pools of coulis alongside the slice. Place gold leaf with tweezers. Finish with three Maldon crystals and one micro herb.

Chef’s Secrets

01 — Temperature

The filling must be poured at exactly 35°C. Too hot and it cooks the eggs. Too cold and it sets before levelling. Use a digital thermometer — it is non-negotiable.

02 — The Wobble

Ready when the outer 4cm is set and the centre wobbles like barely-ripe jelly. If it ripples all the way to the edge it needs more time.

03 — The Plating

Gold leaf placed with tweezers. Three pools of coulis descending in size. Slice placed off-centre. Three Maldon crystals. One micro herb.

The Professional Kitchen Toolkit

🍫 Valrhona 70% Chocolate
View on Amazon →

🥧 Loose-Bottomed Tart Tin
View on Amazon →

🌡️ Digital Thermometer
View on Amazon →

🥊 Fine Mesh Sieve
View on Amazon →

Edible Gold Leaf Sheets
View on Amazon →

🧰 Plating Tweezers
View on Amazon →

Disclosure: This post contains affiliate links. All Cookings earns a small commission at no extra cost to you.

Posted on

Authentic Tiramisu Recipe — Classic Italian Mascarpone Dessert

Classic Italian tiramisu with cocoa dusting, ladyfingers and mascarpone layers
The real tiramisu — six perfect ingredients, layered to perfection.

Few desserts have conquered the world quite like tiramisu. Creamy, coffee-soaked, dusted with cocoa — it is Italy’s gift to the dessert world. Yet so many versions fall flat: too sweet, too soggy, or missing that essential depth of espresso. This is the recipe that gets it right every single time.

The Authentic Story Behind Tiramisu

Tiramisu was invented in the 1960s at Le Beccherie restaurant in Treviso, northern Italy. Its name translates literally as “pick me up” — a nod to the energising combination of espresso and sugar. The original recipe uses only six ingredients: egg yolks, sugar, mascarpone, savoiardi biscuits, espresso, and cocoa powder. No cream. No gelatine. No shortcuts.

Ingredients (Serves 8)

  • 6 large egg yolks, room temperature
  • 150g (¾ cup) caster sugar
  • 500g (2 cups) mascarpone cheese, cold
  • 300ml strong espresso or very strong coffee, cooled
  • 2 tbsp Marsala wine or dark rum (optional but traditional)
  • 24–30 savoiardi (ladyfinger biscuits)
  • Generous unsweetened cocoa powder, for dusting

Method

Step 1: The Zabaglione Base

Whisk the egg yolks and sugar together in a heatproof bowl set over a pot of barely simmering water (bain-marie). Whisk constantly for 8–10 minutes until the mixture is pale, thick, and has doubled in volume. It should hold a ribbon when the whisk is lifted. Remove from heat and allow to cool to room temperature.

Step 2: Fold in the Mascarpone

Add the cold mascarpone to the cooled zabaglione in three additions, folding gently with a spatula until just smooth and no streaks remain. Do not overwork it or the mixture can split. The result should be thick, glossy, and spoonable.

Step 3: Soak the Savoiardi

Combine the cooled espresso with the Marsala or rum. Working quickly, dip each savoiardo for no more than 1–2 seconds per side — they should be moistened but not saturated. A soggy biscuit is the most common tiramisu mistake.

Step 4: Layer and Chill

Spread half the mascarpone cream over the first layer of biscuits. Add a second layer of soaked savoiardi, then top with the remaining cream. Cover and refrigerate for at least 6 hours — overnight is best.

Step 5: Dust and Serve

Tiramisu layers of mascarpone cream and espresso soaked savoiardi
The finished tiramisu — beautiful layers of cream, biscuit and cocoa.

Just before serving, dust generously with high-quality unsweetened cocoa through a fine sieve. Cut into clean portions with a sharp knife wiped between slices. Serve cold.

Equipment That Makes a Difference

Pro Tips for the Best Tiramisu

  • Use real espresso. Instant coffee produces a flat, bitter result.
  • Do not skip the bain-marie. It creates the thick, stable base the cream needs.
  • Chill overnight. A 6-hour minimum rest is non-negotiable.
  • Dust just before serving. Cocoa applied too early loses its matte appearance.
  • Quality mascarpone matters. Look for Italian-imported mascarpone.

Follow us on Instagram and Facebook for daily recipe updates.

Disclosure: This post contains affiliate links. If you purchase through these links, All Cookings earns a small commission at no extra cost to you. We only recommend products we genuinely use and love.

Posted on

Saffron & Honey Kouign-Amann — The Laminated Luxury Series

The Laminated Luxury Series — No. 3 of 8

The Kouign-Amann is Brittany’s greatest contribution to laminated pastry. Butter, dough, sugar — caramelised together under fierce heat until the base is lacquered amber and the interior yields like a cloud. This version elevates it with Persian saffron steeped into the dough itself, and finishes with raw honeycomb and a veil of edible gold.

The result is something between a tarte tatin and a croissant — with a fragrance unlike anything else in the series.


Chef’s Note

Saffron must be bloomed before use. Crush the threads lightly between your fingers, then steep in 2 tablespoons of warm water for 20 minutes minimum. This unlocks the full depth of colour and flavour — a dull orange water means under-steeped saffron. The liquid should run deep gold, almost amber. Add it to the milk before mixing the dough.

The honeycomb goes on last, just before serving. It will begin to dissolve on contact with the caramelised surface — this is intentional. The melting honeycomb becomes part of the glaze.


Ingredients

The Dough

  • 500g strong bread flour
  • 10g fine sea salt
  • 60g caster sugar
  • 10g instant yeast
  • 280ml whole milk, warm
  • 0.5g Persian saffron threads, bloomed in 2 tbsp warm water
  • 30g unsalted butter, softened

The Butter Block (Beurrage)

  • 280g European-style unsalted butter (84% fat), cold

The Caramel Layer

  • 150g caster sugar
  • 1 tsp fleur de sel
  • 40g unsalted butter, softened

To Finish

  • 80g raw honeycomb, broken into shards
  • Edible gold leaf or gold dust
  • Fleur de sel

Method

Day 1 — The Détrempe

Combine the bloomed saffron water with the warm milk. Dissolve the yeast in this mixture. Combine with the flour, salt, and sugar. Add the softened butter and knead for 8 minutes until smooth. Wrap tightly and refrigerate overnight. Shape the butter block into a 20cm square and refrigerate alongside.

Day 2 — Lamination

Perform three double folds with 30-minute refrigerator rests between each, keeping everything below 18°C. After the final fold, rest for 1 hour.

Shaping, Baking & Finishing

Butter a 23cm round tin, dust with half the caster sugar. Roll dough to fit, sprinkle remaining sugar, fleur de sel, and dot with butter. Fold loosely into tin. Proof 45 minutes. Bake at 200°C (fan) for 25–30 minutes until deeply caramelised. Rest 5 minutes in tin, then invert. Cool 15 minutes. Top with honeycomb shards, gold, and fleur de sel just before serving.


The Laminated Luxury Series

No. 2 — Tahitian Vanilla Mille-Feuille  |  You are reading No. 3 — Saffron & Honey Kouign-Amann
Next: No. 4 — Black Sesame Paris-Brest →


🖤 Want All 8 Recipes in One Place?

The complete Laminated Luxury Series — all 8 Michelin-level croissant recipes, technique notes, plating guides, and photography direction — is available as a premium recipe collection in our shop.

Browse the Shop →

Posted on

Fresh Fig Tart Recipe with Almond Frangipane — Elegant Spiral Design

Petals of perfection, a labor of love in every spiral. This fresh fig tart brings together art and flavor.

This stunning fresh fig tart features a buttery crust, a creamy almond frangipane filling, fig jam, and thinly sliced fresh figs arranged in an elegant spiral or rose pattern, finished with a glossy glaze. The image shows a beautiful, intricate design with overlapping fig slices creating swirling patterns and a shiny, caramelized top—likely achieved by baking the figs into the filling and brushing with a glaze like apricot jam or honey afterward.
This style is inspired by classic French tarte aux figues. Here’s a full, detailed recipe adapted for a 9-10 inch (23-25 cm) tart that closely matches the visual. It serves 8-12.
Ingredients
For the pâte sucrée (sweet tart crust):
1 ½ cups (190g) all-purpose flour
½ cup (60g) powdered sugar
¼ tsp salt
½ cup (115g) unsalted butter, cold and cubed
1 large egg yolk
1-2 tbsp ice water (if needed)
For the filling:
½ cup (120g) fig jam (or apricot jam as substitute)
Frangipane (almond cream):
½ cup (115g) unsalted butter, softened
½ cup (100g) granulated sugar
1 cup (100g) almond flour
2 large eggs, room temperature
1 tsp vanilla extract
½ tsp almond extract (optional)
2 tbsp all-purpose flour
Pinch of salt
For the topping:
10-15 fresh ripe figs (depending on size), stems removed
2-3 tbsp honey or apricot jam (for glaze)
1-2 tsp lemon juice
Optional: a sprinkle of chopped pistachios or a few rosemary leaves for garnish
Instructions
Make the tart crust:
In a food processor, pulse flour, powdered sugar, and salt. Add cold butter and pulse until it resembles coarse crumbs (pea-sized pieces).
Add egg yolk and pulse until the dough just comes together. Add ice water 1 tsp at a time if too dry.
Turn out onto a lightly floured surface, shape into a disk, wrap in plastic, and chill for at least 1 hour (or up to 2 days).
Blind bake the crust:
Preheat oven to 375°F (190°C).
Roll out the chilled dough to about ⅛-inch thick and fit into a 9-10 inch tart pan with removable bottom. Trim edges and prick the base with a fork.
Line with parchment paper and fill with pie weights or dried beans. Bake for 15 minutes.
Remove weights and parchment, then bake another 5-10 minutes until lightly golden. Cool completely.
Prepare the frangipane:
Cream softened butter and sugar until light and fluffy (2-3 minutes).
Add eggs one at a time, beating well after each. Mix in vanilla and almond extract.
Fold in almond flour, all-purpose flour, and salt until smooth and creamy.
Assemble the tart:
Spread a thin, even layer of fig jam over the cooled crust.
Spread the frangipane filling evenly over the jam, leaving a small border.
Thinly slice the fresh figs (about ⅛-inch thick slices, lengthwise or crosswise for variety in color and shape).e97092
Create the spiral/rose design:
Arrange the fig slices starting from the outer edge, overlapping them slightly in a circular pattern with the cut sides facing up. Work inward in concentric circles or gentle spirals, tucking slices to form the swirling, rose-like effect seen in your image. The darker purple skins and pink interiors create beautiful contrast.
For extra gloss during baking, lightly brush slices with a bit of honey mixed with lemon juice.
Bake:
Bake at 350°F (175°C) for 35-45 minutes, until the frangipane is puffed, golden, and set, and the figs are softened and caramelized at the edges. The top should develop a glossy, slightly sticky sheen.
Glaze and finish:
While still warm, gently brush the figs with warmed apricot jam or honey (thinned with a splash of water or lemon juice) for that high-shine finish.
Cool on a wire rack. Optional: dust lightly with powdered sugar or add chopped nuts just before serving.
Serving Suggestions
Serve at room temperature or slightly warm. Pair with vanilla ice cream, whipped cream, or crème fraîche. It keeps well covered in the fridge for 2-3 days, though the crust is best the day it’s made.
Tips for Success
Use ripe but firm figs for the best slices—they hold shape better when thin.
The spiral design takes patience but creates the wow factor. Practice overlapping for the braided/swirled look.
For a quicker version, use store-bought puff pastry or shortcrust and a simple cream cheese or mascarpone base instead of full frangipane.
Blind baking prevents a soggy bottom, especially with the juicy figs.
This recipe yields a professional-looking tart with balanced sweetness, nutty almond notes, and fresh fig flavor. Enjoy baking it—your version looks bakery-worthy! If you have a preferred crust type (e.g., puff pastry) or dietary tweaks, let me know for adjustments.

Posted on 1 Comment

Raspberry Pavlova Recipe with Raspberry Gel Veil — Plated Meringue Dessert

Poetry through pastry: A work of art on a plate, where every detail tells a story of dedication and regional pride.

Capture the essence of summer elegance with this Signature Raspberry Pavlova. Moving beyond the rustic ‘broken’ look of traditional meringues, this plated masterpiece features a delicate fruit veil—a technique that transforms simple raspberry puree into a translucent, silken shroud. It’s a study in texture, balancing a shattered-glass crust with a heart as soft as a cloud.

Recipe

1.Pavlova Base (Swiss meringue) method)

The Swiss method is more stable and less likely to crack, proving a smooth surface for the gel.

  • 150g egg whites
  • 300g caster sugar
  • 5g cornstarch
  • 5g white vinegar or lemon juice
  • 2g fine salt

Method:

  1. Whisk egg whites and sugar in a heatproof bowl over a pot of simmering water(Bain Marie). Whisk until the sugar is completely dissolved and the mixture reaches 50°C (122°F)
  2. Remove from heat and whip on high speed until the bowl feels cool and peaks are stiff and glossy.
  3. Fold in the cornstarch, vinegar and salt.
  4. Pipe 8-10cm rounds with flat tops. Bake at 100°C (212°F) for 90minutes. Turn off the oven and let them cool completely inside with the door cracked.

2. The whipped cream filling

Since pavlova is hollow/ airy, you need a buffer layer of cream to support the weight of the gel veil.

  • 200g heavy whipping cream
  • 20g powdered sugar
  • 5g vanilla bean paste

Method: whip until stiff peaks for. Spoon a generous dollop onto the center of each cooled pavlova.

3. The Raspberry Gel veil

This is the flexible sheet.

  • 250g raspberry puree
  • 50g water
  • 40g caster sugar
  • 4g Agar-agar powder

Method:

  1. Whisk all ingredients in a saucepan. Bring to a rolling boil for 2minutes(required to activate the agar-)agar)
  2. Pour onto a flat, silicone mat lined tray. Tilt to create a layer about 1-2mm thick
  3. Let sit in the fridge for 20minutes. Use a round cutter to create circles larger than your pavlova.

4. Raspberry coulis

  • 200g raspberry puree
  • 50g caster sugar
  • A squeeze of lemon
  • A little bit of water if needed(optional, for consistency)

Method:

  1. Heat the ingredients. Place the raspberry puree, sugar, lemon juice in a small saucepan over medium heat.
  2. Cook until soft. Bring the mixture to a gentle boil and cook for about 5 to 10 minutes, stirring occasionally, until the the sugar is completely dissolved.
  3. Blend. Remove from the heat and transfer the mixture to blender or food processor. Blitz until completely smooth.
  4. Adjust and store. Check the consistency and taste. If it’s too thick, add a little water, add more sugar if desired.

4.Fresh Berry Garnish.

  • 150g fresh raspberries
  • 100g fresh blackberries or blueberries
  • Small mint leaves or micro greens for the top

Assembly to match the image

  1. Place the pavlova on a dark plate.
  2. Top with smooth layer of whipped cream
  3. Gently lift a circle of raspberry gel veil and drop it over the cream so it ripples down the sides.
  4. Surround the bas with 150g berries.
  5. Garnish with the tiny dots of raspberry coulis and micro mint leaved.

https://amzn.to/4lN3AMt