★ Michelin Star Series ★
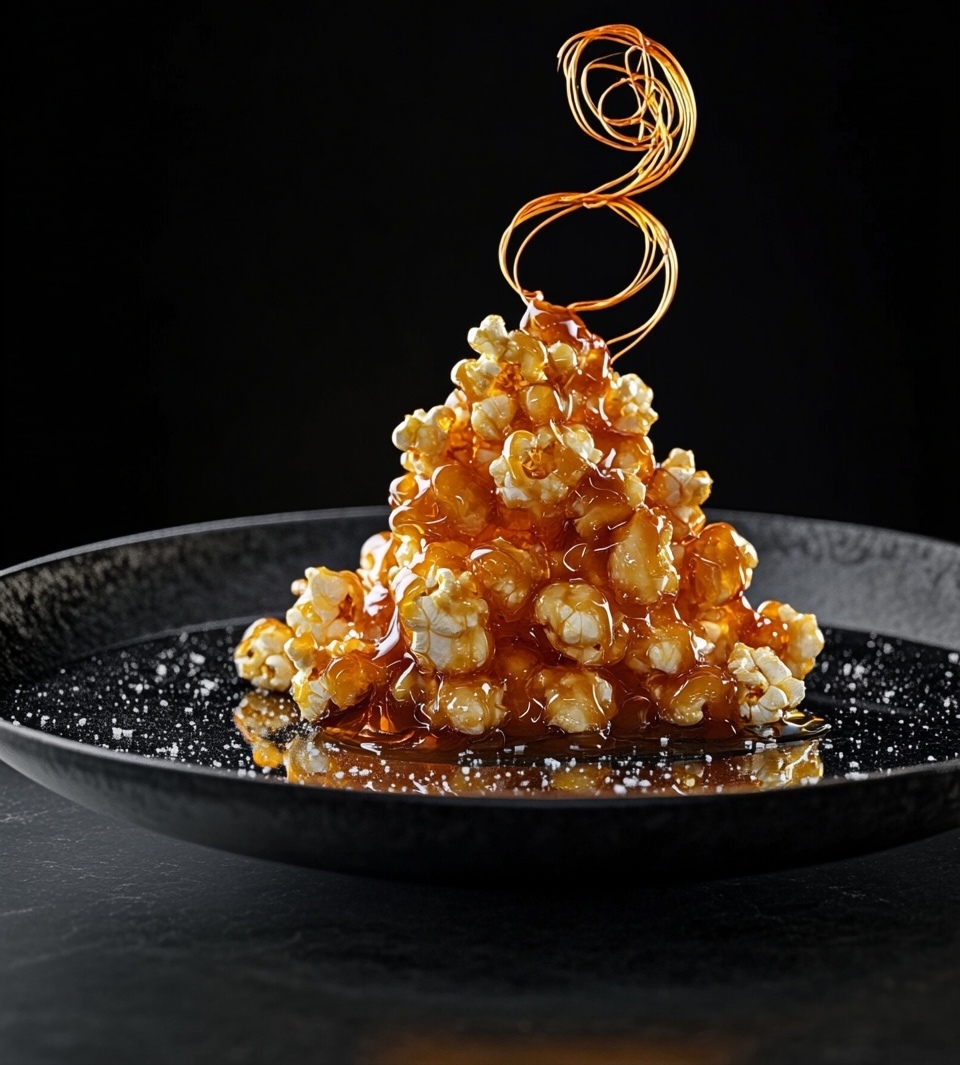
The Popcorn Cinema Homage
Popcorn Ice Cream · Chocolate Sponge · Cherry Coke Curd · Peppermint Chocolate Rocks · Salted Caramel Powder
An elevated love letter to cinema nostalgia — every flavour and texture of the movie theatre experience, reimagined through the lens of Michelin fine dining.
⏱ Prep: 4 hours · ⏲ Freeze: overnight · 🍿 Serves: 6 · ⭐ Difficulty: Expert
The Concept
Nostalgia is one of the most powerful flavour triggers in the human experience. The Popcorn Cinema Homage takes every sensory memory of the cinema — the hot butter and salt of popcorn, the carbonated sweetness of cola, the cool sting of peppermint, the crunch of chocolate — and rebuilds each one using professional pastry techniques that elevate the familiar into the extraordinary.
The salted caramel powder, made using N-Zorbit M (a tapioca-based fat absorber), is the showpiece — dry and free-flowing at room temperature, it dissolves on the tongue into pure, liquid caramel. The peppermint chocolate rocks shatter. The Cherry Coke curd fizzes on the palate. This is sensory theatre.
It is childlike and sophisticated in equal measure. That is the point.
Ingredients
01 — Popcorn Ice Cream
500ml whole milk
200ml double cream
80g fresh popcorn (salted butter)
6 egg yolks
140g caster sugar
1 tsp vanilla extract
02 — Chocolate Sponge
3 eggs
90g caster sugar
60g plain flour
30g dark cocoa powder
30g unsalted butter, melted
Pinch of salt
03 — Cherry Coke Curd
200ml Coca-Cola (reduced to 80ml)
100ml Morello cherry juice
3 egg yolks
60g caster sugar
80g unsalted butter, cold & cubed
1 tsp citric acid
04 — Peppermint Chocolate Rocks
200g dark chocolate (70%)
1 tsp peppermint oil (food grade)
iSi siphon + 2 N₂O cartridges
2 gelatine leaves
100ml double cream
05 — Salted Caramel Powder
150g caster sugar
50ml double cream
30g unsalted butter
1 tsp Maldon sea salt
60g N-Zorbit M (tapioca maltodextrin)
The Method
Step 01 — Popcorn Ice Cream (night before)
Heat milk and cream to a simmer. Add warm popcorn and infuse off the heat for 25 minutes. Strain, pressing hard to extract all the buttery, savoury flavour. Discard the popcorn. Make a crème anglaise base with yolks and sugar (cook to 82°C). Combine with infused milk, cool over ice, churn, and freeze overnight.
Step 02 — Chocolate Sponge
Preheat oven to 180°C. Whisk eggs and sugar over a bain-marie until warm, then whip on a stand mixer to ribbon stage (6–8 minutes). Sift flour, cocoa and salt, fold in gently. Add melted butter last, fold until just incorporated. Spread thinly on a lined baking tray. Bake 8–10 minutes until just set. Cool. Cut into rectangles using a 6x3cm cutter.
Step 03 — Cherry Coke Curd
Reduce Coca-Cola in a saucepan to a syrup of 80ml — this concentrates the cola flavour dramatically. Whisk with cherry juice, yolks, and sugar in a bain-marie until thickened (83°C). Off heat, whisk in cold butter piece by piece until emulsified. Stir in citric acid. Pass through a fine sieve, cool with cling film pressed on the surface. Pipe into small rounds using a piping bag.
Step 04 — Peppermint Chocolate Rocks (Aero Method)
Melt chocolate with cream and bloomed gelatine. Cool to 35°C. Add peppermint oil — start with 3 drops and taste. Pour into an iSi siphon, charge twice, dispense into a container and freeze immediately. Once solid, break into irregular shards. Keep frozen until plating.
Step 05 — Salted Caramel Powder (N-Zorbit M)
Make a dry caramel to amber. Deglaze carefully with cream, stir in butter and salt. Cool to room temperature. Place N-Zorbit M in a food processor. With the motor running, slowly pour the caramel in a thin stream. The fat absorber converts the liquid into a dry, scoopable powder. Store in an airtight container.
Step 06 — Plating (The Cinema Experience)
Place the chocolate sponge rectangle as the base. Pipe three rounds of Cherry Coke curd alongside it. Arrange three peppermint chocolate rocks in a cluster. Quenelle the popcorn ice cream and set it on the sponge. Drift the salted caramel powder over the plate in a sweeping arc. Finish with two pieces of real popcorn placed on top of the ice cream quenelle.
Understanding N-Zorbit M
What It Is
N-Zorbit M is tapioca maltodextrin — a fat-absorbing starch that converts fat-based liquids into dry powders without losing flavour.
The Ratio
Start with a 60:40 ratio of N-Zorbit to liquid fat. Adjust by adding more N-Zorbit if the mixture stays sticky, or more liquid if too dry.
On The Tongue
The powder dissolves the moment it makes contact with saliva, flooding the palate with the original liquid flavour. It is one of the most dramatic textural effects in molecular gastronomy.
Other Uses
Foie gras powder, olive oil powder, peanut butter powder — any fat-based liquid can be transformed. It is one of the most versatile tools in the modern pastry kitchen.