Posted on

Banana Chocolate Cake Recipe with Homemade Banana Ice Cream

Bananas and chocolate: A perfect Love story

Elegant Banana Chocolate Cake with Banana Ice Cream. This recipe recreates the beautiful dessert from the image: a rich, fudgy chocolate cake studded with caramelized banana slices, finished with glossy chocolate drizzle, and paired with a creamy scoop of homemade banana ice cream. It’s decadent yet surprisingly simple, perfect for an elegant dinner party. The cake has a dense, brownie-like texture with visible banana pieces inside, just like the photo.

Serves: 8–10
Prep time: 30 minutes
Bake/Chill time: 35 minutes (cake) + 4 hours (ice cream)Chocolate Banana

Cake Ingredients:

  • 200 g (7 oz) dark chocolate (70% cocoa), chopped
  • 180 g (¾ cup + 2 tbsp) unsalted butter, plus extra for greasing
  • 150 g (¾ cup) light brown sugar
  • 100 g (½ cup) granulated sugar
  • 3 large eggs, room temperature
  • 2 ripe bananas, mashed (about 200 g)
  • 120 g (1 cup) all-purpose flour
  • 40 g (⅓ cup) unsweetened cocoa powder
  • 1 tsp baking powder
  • ½ tsp salt
  • 2–3 firm ripe bananas, sliced into ½ cm (¼ inch) rounds (for embedding in the batter)
  • 100 g (3.5 oz) dark chocolate, melted (for the elegant drizzle)

Instructions:

  1. Preheat oven to 175°C (350°F). Grease and line a 20 cm (8 inch) round cake pan with parchment paper.
  2. Melt the chopped chocolate and butter together in a heatproof bowl over simmering water or in the microwave (30-second bursts). Stir until smooth. Let cool slightly.
  3. Whisk in both sugars, then add the eggs one at a time, mixing well after each. Stir in the mashed bananas.
  4. In a separate bowl, sift together flour, cocoa powder, baking powder, and salt. Gently fold the dry ingredients into the wet mixture until just combined (do not overmix — this keeps it fudgy).
  5. Pour half the batter into the prepared pan. Arrange the banana slices in a single layer over the batter (this creates the beautiful banana pieces you see when sliced). Pour the remaining batter on top and smooth the surface.
  6. Bake for 32–35 minutes. The center should still have a slight jiggle — it will set as it cools (the cake is meant to be dense and moist like the photo).
  7. Cool completely in the pan, then turn out onto a plate. Drizzle generously with the melted dark chocolate using a spoon or piping bag for those elegant chocolate rivulets.

No-Churn Banana Ice CreamIngredients:

  • 4 very ripe bananas, peeled and frozen overnight (in chunks)
  • 300 ml (1¼ cups) cold heavy cream
  • 80 g (⅓ cup) sweetened condensed milk
  • 1 tsp vanilla extract
  • Pinch of salt
  • 1 tbsp fresh lemon juice (to brighten the flavor)

Instructions:

  1. Place the frozen banana chunks, cream, condensed milk, vanilla, salt, and lemon juice in a food processor or high-speed blender.
  2. Blend until completely smooth and creamy (about 2–3 minutes). It will look exactly like soft-serve at this stage.
  3. Transfer to a loaf pan, cover with plastic wrap, and freeze for at least 4 hours (or overnight) until scoopable.

To Serve (Exactly Like the Image)

  • Place a generous slice of the chocolate banana cake on a white plate (off-center for elegance).
  • Add one perfect scoop of banana ice cream right beside it.
  • Drizzle a little extra melted chocolate over both the cake and the plate edge.
  • Optional finishing touch: a tiny edible flower or gold leaf for extra elegance, or a few fresh banana slices and a light dusting of cocoa.

Pro Tips for Restaurant-Level Results:

  • Use slightly under-ripe bananas for the slices inside the cake so they hold their shape and caramelize beautifully.
  • The cake can be baked a day ahead; it actually tastes even better the next day.
  • For the most luxurious ice cream texture, churn it in an ice-cream maker if you have one (same ingredients, follow machine instructions).

Enjoy your homemade version of this stunning dessert — it looks and tastes exactly like the elegant plate in the image! Let me know if you’d like a gluten-free version, step-by-step photos, or any adjustments.

https://amzn.to/4s1h1tS

Posted on

Noir Croissant Recipe — Black Cocoa Laminated Croissant with Dark Chocolate Ganache

The Laminated Luxury Series — No. 1 of 8

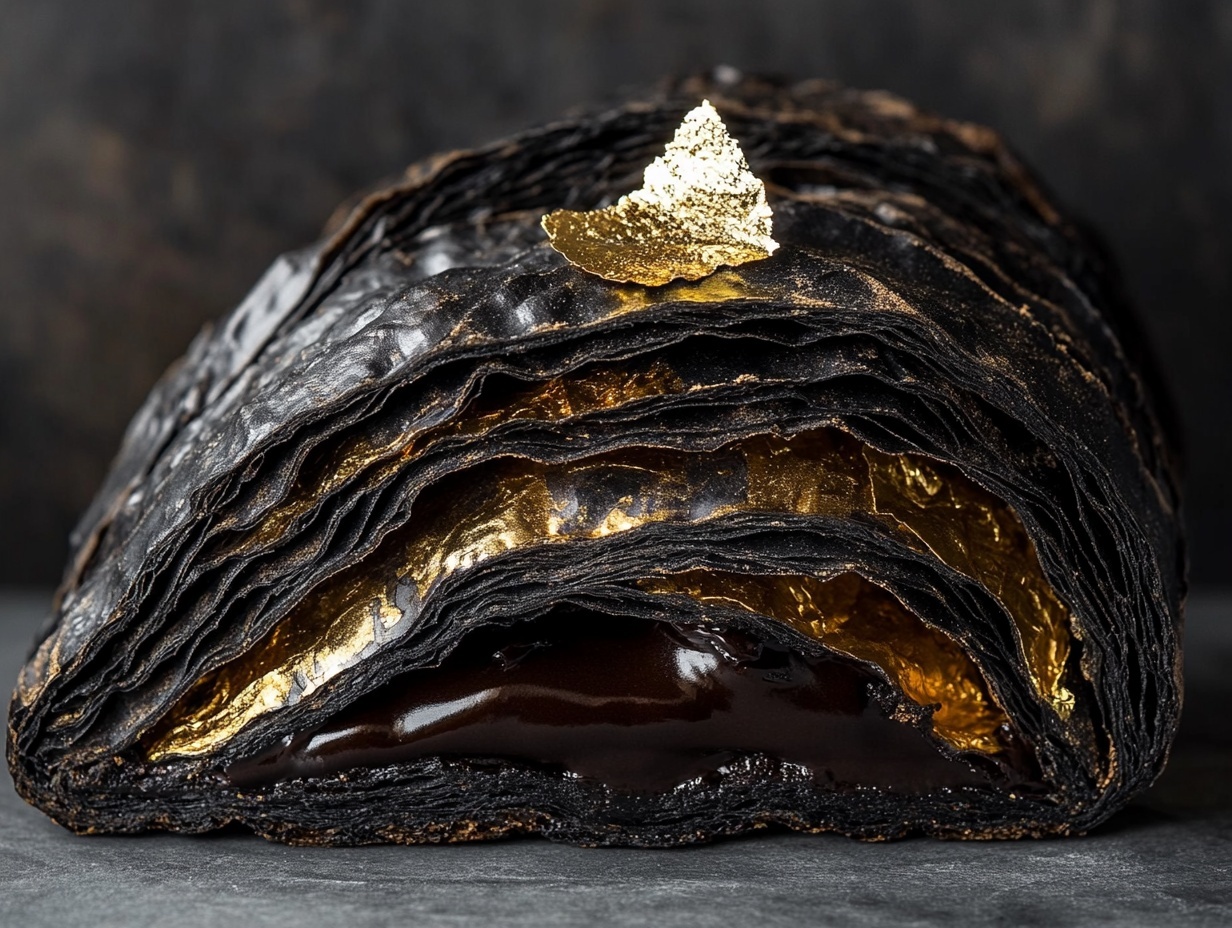
Some pastries announce themselves quietly. The Noir Croissant does not. Built from black cocoa-laminated dough, filled with a bittersweet 85% dark chocolate ganache, and finished with a whisper of edible gold leaf — this is a croissant that commands the room.

This recipe opens the Laminated Luxury Series — eight recipes that treat the croissant not as a breakfast staple, but as a canvas for Michelin-level patisserie.


Chef’s Note

The key to the Noir Croissant is restraint. The black cocoa doesn’t just colour the dough — it deepens the flavour, adding a subtle bitterness that balances the richness of the ganache. Laminate cold, rest often, and bake until the exterior is shatteringly crisp. A soggy croissant is a failed croissant.

The gold leaf is not decoration. It is a statement.


Ingredients

The Dough

  • 500g strong bread flour
  • 25g black cocoa powder
  • 10g fine sea salt
  • 80g caster sugar
  • 10g instant yeast
  • 300ml whole milk, cold
  • 30g unsalted butter, softened

The Butter Block (Beurrage)

  • 280g European-style unsalted butter (84% fat), cold
  • 10g black cocoa powder

Dark Chocolate Ganache Filling

  • 200g 85% dark chocolate, finely chopped
  • 180ml double cream
  • 20g unsalted butter
  • 1 tsp fleur de sel

To Finish

  • 1 egg yolk + 1 tbsp cream (egg wash)
  • Edible gold leaf
  • Fleur de sel, to garnish

Method

Day 1 — The Détrempe

Whisk together the flour, black cocoa, salt, and sugar. Dissolve the yeast in the cold milk, then combine with the dry ingredients. Mix until a shaggy dough forms, then add the softened butter. Knead for 8 minutes until smooth. Wrap tightly in cling film and refrigerate overnight.

Day 1 — The Beurrage

Beat the cold butter with black cocoa until fully combined and pliable. Shape into a 20cm square between two sheets of parchment. Refrigerate alongside the dough.

Day 2 — Lamination (3 × Double Folds)

Encase the butter block in the dough, then perform three double folds (book folds), resting in the refrigerator for 30 minutes between each fold. After the final fold, rest for a minimum of 1 hour. Target: 128 layers of butter. Do not rush this.

Shaping & Proofing

Roll the laminated dough to 4mm thickness. Cut into long triangles (base 10cm, height 22cm). Roll tightly from base to tip, placing point-side down on lined baking trays. Proof at 24°C for 2–2.5 hours until visibly puffed and the layers are clearly defined.

Baking

Preheat the oven to 190°C (fan). Brush gently with egg wash — do not let it drip into the layers. Bake for 18–20 minutes until deeply dark and shatteringly crisp. Cool completely on a wire rack before filling.

The Ganache

Heat the cream until just simmering. Pour over the chopped chocolate in three additions, stirring from the centre out. Add the butter and stir until glossy. Season with fleur de sel. Allow to set at room temperature until pipeable (approximately 2 hours).

Assembly

Cut a slit along the base of each croissant. Pipe the ganache generously inside. Place a single sheet of edible gold leaf across the top. Finish with a pinch of fleur de sel.


Technique Notes

Temperature is everything. Lamination fails when butter melts into dough. Keep everything below 18°C throughout. If the dough feels greasy, stop and refrigerate immediately for 20 minutes.

The black cocoa. Dutch-processed to an extreme degree — it carries almost no fat, so it won’t interfere with the gluten structure. Do not substitute with regular cocoa.

Baking dark doughs. The black colour makes it difficult to judge doneness by eye. Listen — a properly baked croissant sounds hollow when tapped on the base.


The Laminated Luxury Series

You are reading No. 1 — Noir Croissant
Next: No. 2 — Tahitian Vanilla Mille-Feuille Croissant →

View the full series: French Classics | Michelin Star Series